Quantcast
Channel: Scripting Blog
Viewing all 117 articles
Browse latest View live

Using PowerShell to View and Remove Wireless Profiles in Windows 10 – Part 1

$
0
0

Summary: Using PowerShell and Regular Expressions as a wrapper on NetSh.exe output to identify the profiles.

Hey, Doctor Scripto!

I have a whole pile of old Wireless profiles that have been collecting dust. I know I can use NETSH to view and delete them, but the process is very manual. Do you know if there is an easier way to clear them up?

—WF

Hello WF, you asked I shall help. Doctor Scripto is in the house!

I know the process you mean, I had to do this a few years ago on one of my old laptops. I had wireless profiles from my home, hotels, offices, coffee shops. It was just silly. I think there were about twenty-five or more at the time.

For those unfamiliar with the process in the question, you can run the following command in a shell to list your wireless profiles.

Netsh wlan show profile

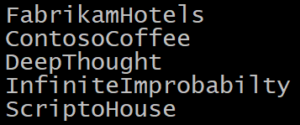
You will get an output similar to this (Depending on how many profiles it could be a much larger or smaller list)

Let’s imagine we need to delete the profile called ‘ScriptoHouse’. We would then execute this Command in the shell.

Netsh wlan delete profile ScriptoHouse

That would remove the profile for the Hotspot called ‘ScriptoHouse’. For one profile, this is not too bad.

But what if you have MANY profiles? Or you’d like a way to show these an object to manipulate? PowerShell can aid in the aspect.

Our first challenge is to capture the output as an object in PowerShell

$list=(netsh.exe wlan show profiles)

Once you have this as a String object you can play with regular expressions.

One thing you’ll notice is all of the lines with Profile names on them have a colon and preceded by ‘All user Profile’ and about 5 spaces.

So first let’s use a simple Regular Expression that shows us “all lines with a :”

$list -match ':'

Now that’s cleaned up a lot of the data to a point we have a smaller array!

Since the first line is something we don’t need, we could at this point probably just say “skip the first line and show the remaining data…”.

This would actually work well with a small loop like this.

$list=(netsh.exe wlan show profiles) -match ':'

# We start at position 1 in the Array to skip over the first line

For ($x=1; $x -lt $li.count; $x++)
{
# Examining the String shows the Profile name starts at position 27
$li[$x]
}

At this point we could call it good for pulling up the profile information with PowerShell other than some additional cleanup. But if a regular expression got us THIS far, could it get us a bit further? The answer is “Yes”.

Instead of doing a loop, we’ll build a bigger regular expression. We can expand the expression to say “Find me only lines with at least two spaces followed by a Colon and then one space”.

We can do that with the following -match statement

$list=(netsh.exe wlan show profiles) -match '\s{2,}:\s'

If you’re new to regular expressions the line above translates to

“Find me a section with two spaces or more at least ….. \s{2,}”

“It’s followed by a colon …. :”

“Then it needs to be another space …. \s”

Now we’ve found two ways of solving the same problem. Why choose one over the other? Well as I often say to myself, “There are a dozen ways to do the same thing in PowerShell and they’re all correct”

Sometimes it’s a matter of deciding which you are most comfortable with, and of course sometimes, which method is most efficient.

We’ll look at that next week when we continue our work on using PowerShell to work with Wireless profiles.

I invite you to follow me on Twitter and Facebook. If you have any questions, send email to me at scripter@microsoft.com, or post your questions on the Official Scripting Forum. See you tomorrow. Until then, peace.

Your good friend, Doctor Scripto

PowerShell, Doctor Scripto, Sean Kearney, Regular Expression


The post Using PowerShell to View and Remove Wireless Profiles in Windows 10 – Part 1 appeared first on Scripting Blog.


PowerTip: Converting a Here-String to an Array in One Line with PowerShell

$
0
0

Summary: Using the split method in a more powerful fashion to split an array based upon two line terminating types

A picture containing scissors Description automatically generated

Hey, Doctor Scripto. I was wondering if there was a more efficient way of converting a Here-String to an Array when there were multiple line termination options like Linefeed or Carriage Return and Linefeed?

There most definitely is. You can pass multiple parameters to the split method. This example traps both!

$HereStringSample=@’
Banana
Raspberry
‘@

$HereStringSample.Split(@(“$([char][byte]10)”, “$([char][byte]10)”,”$([char][byte]13)”, [StringSplitOptions]::None))

PowerShell, Doctor Scripto, PowerTip, Paulo Morgado

The post PowerTip: Converting a Here-String to an Array in One Line with PowerShell appeared first on Scripting Blog.

Using PowerShell to View and Remove Wireless Profiles in Windows 10 – Part 2

$
0
0

Summary: Using Measure-Command to determine the fastest approach to a solution.

Last week we were having some fun using PowerShell as a wrapper around the NetSh.exe command’s output. We were left at a decision point.

Which way to go? A For loop to clean up the data, which worked fine or Regular Expressions. Although both work which was the better path to use?

For me initially, when I first started in PowerShell I very often used a For loop for a few reasons.

  • It was a simple to navigate loop
  • I could see the inner workings in a breakpoint
  • it was pretty easy to troubleshoot problems with variables within

But as I progressed in my knowledge of PowerShell I’ve started to touch on Regular expressions as a solution when possible.

A good reason is although they are more complex to work with, the provide a better response time in some cases. As well they also allow me to obtain data without trying to say to myself “Hmmm, where does this substring start and end?”

But right now we have an answer and I’d like to help you figure out how to decide which would be the better way to proceed. We can use Measure-Command to decide which method is faster.

Here’s our first example using a loop to skip on the first line. This is something you might do if you’re first using PowerShell and trying to figure out how to parse data. It is wrapped in the Measure-Command Cmdlet to identify how long it takes

Measure-Command { $list=(netsh.exe wlan show profiles) -match ':'; For ($x=1; $x -lt $list.count; $x++) { $_ } }

Here is our second solution using only a regular expression.

Measure-Command { $list=(netsh.exe wlan show profiles) -match '\s{2,}:\s'; $list }

Now if you run each in PowerShell you might find sometimes for some reason, the more complex loop takes less time, and then sometimes more.

I had my head scratching on this one. “This makes no sense” I was thinking until I realized that with a proper test, I should run multiple samples. Especially since results I saw were roughly less than 1/3 of second in some cases.

The solution to this was easy, I just ran the same solution 100 times with Measure-command

1..100 | Measure-Command { `
$list=(netsh.exe wlan show profiles) -match ':'; `
For ($x=1; $x -lt $list.count; $x++) { $_ } `
}

Now of course this gave me a large result in Milliseconds I would need to divide by 100 to get the results.

(1..100 | Measure-Command { `
$list=(netsh.exe wlan show profiles) -match ':'; `
For ($x=1; $x -lt $list.count; $x++) { $_ } `
}).totalmilliseconds / 100


But another way would be to break apart the Measure-Command objects into an array and use the Measure-Object to do the math. For this we’d need to use For-Each Object to have Measure-Command return each result as a single instance.

(1..100 | foreach-object { Measure-Command { `
$list=(netsh.exe wlan show profiles) -match ':'; `
For ($x=1; $x -lt $list.count; $x++) { $_ } `
}}) | Measure-Object -Property Milliseconds -Average


I prefer this second method as it produces a nice report of how many tests, the actual average and the property we’re measuring. But they both technically work.

The results I got on average for this code was about 159 milliseconds.

I then generated the same solution to test the line using just a regular expression.

(1..100 | Foreach-Object { Measure-Command `

{ $list=(netsh.exe wlan show profiles) -match '\s{2,}:\s'; $list `

} }) | Measure-Object -Property Milliseconds -Average


As you can see with over a 100 runs the Regular Expression solution is SLIGHLTY faster. Which means if this were a very large set of data, it could be a big difference in time.

But with this smaller set of data, a For loop is just as valid solution as long as the data results are consistent.

Going forward in this solution, I’m going to choose the moderately faster solution (Regular Expressions) because well, I’m a geek and 2 Milliseconds means a lot to me 😉

Next week we’ll look deeper into parsing the data to only have the Profile name.

I invite you to follow me on Twitter and Facebook. If you have any questions, send email to me at scripter@microsoft.com, or post your questions on the Official Scripting Forum. See you tomorrow. Until then, peace.

Your good friend, Doctor Scripto

PowerShell, Doctor Scripto, Sean Kearney


The post Using PowerShell to View and Remove Wireless Profiles in Windows 10 – Part 2 appeared first on Scripting Blog.

PowerTip: Identify Drives Encrypted with Bitlocker

$
0
0

Summary: Using the Get-Bitlocker Cmdlet to show the status of drives on your Windows 10 computer

A picture containing scissors Description automatically generated

Hey, Doctor Scripto. Is there a nice simple way to see if drives are Bitlocker encrypted?

A most excellent question! You can the Get-BitlockerVolume Cmdlet and filter on the VolumeStatus property. Here’s an example of a line that will show only drives which have Bitlocker enabled.

Get-BitLockerVolume | Where-Object { $_.VolumeStatus -eq ‘FullyEncrypted’ }

PowerShell, Doctor Scripto, PowerTip, Sean Kearney


The post PowerTip: Identify Drives Encrypted with Bitlocker appeared first on Scripting Blog.

Using PowerShell to View and Remove Wireless Profiles in Windows 10 – Part 3

$
0
0

Summary: Using Regular Expressions to cleanup string data from NetSh.exe.

Let’s remember the last two discussions. The first time we looked at using PowerShell to identify wireless profiles with some simple regular expressions. We followed up the next week with how to identify which approach would be the fastest.

Today we’re going to take that array of information and clean it up so we only have the profile names.

As a quick reminder here’s the line in PowerShell we used to capture the list of Wireless profiles

$list=(netsh.exe wlan show profiles) -match '\s{2,}:\s'

The resulting output looked like this

What we need to do now is cleanup this data so show only the Wireless Profile name so that we can pass that name back to “Netsh.exe wlan delete profile

Again we can look at two solutions. I can solve this with a Regular Expression but again, depending on how well versed you are in PowerShell we’ll look at this with a simple For loop.

$WlanProfileList=foreach ($item in $list) { $item.substring(27) }

If you examine $WlanProfileList you will see this output

But another solution would be to use a Regular Expression. What I would REALLY like to do is find everything up to the Colon and the space preceding the name and erase that.

We can do that with this regular expression

$list – replace '.*:\s' , ''

What this translates to is

“Get me everything before the next character….. .*”

“That next character is a colon …. :”

“followed by a single space …. \s”

“then replace it with this value (nothing) …. ””

This will produce the same output as the for loop.

Now we’ll use the same process as last time to determine the fastest approach. This time we’ll test it 1000 times.

(1..1000 | foreach-object { Measure-Command { $WlanProfileList=foreach ($item in $list) { $item.substring(27) } }}) | Measure-Object -Property Milliseconds -Average

Vs.

(1..1000 | foreach-object { Measure-Command { $list –replace '.*:\s' , ''}}) | Measure-Object -Property Milliseconds -Average

In this situation you’ll find that due to the low data size the results are too close. But if we’re using Regular Expressions, we can write the entire thing in one line.

$list=((netsh.exe wlan show profiles) -match '\s{2,}:\s') -replace '.*:\s' , ''

Pretty cool eh?

Now at this point, we have a list of profile names we can start deleting.

…and for that we’ll meet up next week and discuss how can solve this 😊

I invite you to follow me on Twitter and Facebook. If you have any questions, send email to me at scripter@microsoft.com, or post your questions on the Official Scripting Forum. See you tomorrow. Until then, peace.

Your good friend, Doctor Scripto

PowerShell, Doctor Scripto, Sean Kearney


The post Using PowerShell to View and Remove Wireless Profiles in Windows 10 – Part 3 appeared first on Scripting Blog.

PowerTip: Show all Installed Capabilities on Windows 10

$
0
0

Summary: Identify if capabilities like OpenSSH are installed in your Windows 10 Operating System

A picture containing scissors Description automatically generated

Hey, Doctor Scripto. I was curious if there was a way to see if a workstation has a capability installed on it like OpenSSH. I’m trying to report on this for my environment.

Absolutely! You can run the following line on a workstation to show the installed Capabilities like OpenSSH

Get-WindowsCapability -Online | Where-Object { $_.State -eq ‘Installed’ }

PowerShell, Doctor Scripto, PowerTip, Sean Kearney

The post PowerTip: Show all Installed Capabilities on Windows 10 appeared first on Scripting Blog.

Using PowerShell to View and Remove Wireless Profiles in Windows 10 – Part 4

$
0
0

Summary: Using Windows PowerShell to purge Wlan profiles with NetSh.exe.

Last week we had a way with a Regular Expression to run one Netsh.exe command and show only the profile names as a PowerShell Array.

Today we’re going to finish the task and show you how to delete those Profiles.

As a quick reminder here’s the line in PowerShell we used to capture the list of Wireless profiles by only their names as an Array.

$list=((netsh.exe wlan show profiles) -match '\s{2,}:\s') -replace '.*:\s' , ''

The resulting output containing our Wireless profile names looked like this

From our first posting we saw that to delete a WLAN profile in Netsh.exe we would execute this command.

Netsh.exe wlan delete profile PROFILENAME

Where PROFILENAME was the name of a WLAN profile such as FabrikamHotels.

So we could just purge everything with one loop like this

Foreach ($item in $list)
{
     Netsh.exe wlan delete profile $item
}

But I personally don’t like that. It gives me too little control, I’d rather have a function that says “show me the profiles” or even “show me only this profile”. And then I’d like the Delete to be only the information I give it (Control)

First we’ll build a function to show us the profiles, perhaps even a way to filter on them.

As part of it’s design we’ll build it as if we were building a Cmdlet as we eventually may want to add this to a Module

function Get-WifiProfile
{
     [cmdletbinding()]
     param
     (
     [System.Array]$Name=$NULL
     )

First thing to do is grab the list of WLAN profiles as part of our Begin.  Look closely below and you’ll see the NETSH.EXE line we ran earlier to find the profiles and show only the names.

Begin
     {
          $list=((netsh.exe wlan show profiles) -match '\s{2,}:\s') -replace '.*:\s' , ''

Now we’ll rebuild that array as a PowerShell Customobject. Currently we’re only returning names, but we could build upon this later and return details of the WLAN Profiles

$ProfileList=$List | Foreach-object {[pscustomobject]@{Name=$_}}
     }

Now that we have the list, let’s show profiles which match the provided names in the array

Process
     {
          Foreach ($WLANProfile in $Name)
          {
               $ProfileList | Where-Object { $_.Name -match $WLANProfile }
          }

     }

However if NOTHING is provided, we will return ALL available WLAN Profiles

End
     {
          If ($Name -eq $NULL)
          {
               $Profilelist
          }
     }
}

Now that it’s built, at least in our Script we could run this for profiles

Get-WifiProfile -name Contoso

If Contoso was there it would return as an object we could consume.

We can even provided a targeted list of WLAN Profiles

Get-WifiProfile -name Contoso, Fabrikam, DoctorScripto

It would of course try to find each one provided, and return the list as an object.

Get-WifiProfile would return everything found.

Now that we have a way to get only Specific profiles or all of them.

Next we’ll build a function in PowerShell to delete defined list of WLAN profiles. In reality we’re just wrapping PowerShell around the NETSH.exe command to simplify its use and automate it a bit more.

We could even trap for “Deleted” or “Not found to delete” conditions.

First we define the name of function. Because we’re planning in the long term to make this into a profile, I used “Get-Verb” to see a list of approved verbs. “Remove” is good to use!

function Remove-WifiProfile
{
     [cmdletbinding()]
     param
     (
          [System.Array]$Name=$NULL
     )
     begin{}

We’ll step the list of provided WLAN Profile names

process 
     {
          Foreach ($item in $Name)
          {

We will try to purge each individual one

$Result=(netsh.exe wlan delete profile $item)

As we trap the results, we’ll return something to indicate Success

If ($Result -match 'deleted')
          {
               "WifiProfile : $Item Deleted"
          }

…or failure (wasn’t there to delete)

else
          {
               "WifiProfile : $Item NotFound"
          }
     }

Now we have two useful functions we can use in a script to deal with Profiles. We could even package these into a module or extend their features to allow proper piping.

But that’s a story for a different day. Meet up with us next week when we look into the Active Directory Cmdlets.

I invite you to follow me on Twitter and Facebook. If you have any questions, send email to me at scripter@microsoft.com, or post your questions on the Official Scripting Forum. See you tomorrow. Until then, peace.

Your good friend, Doctor Scripto

PowerShell, Doctor Scripto, Sean Kearney

The post Using PowerShell to View and Remove Wireless Profiles in Windows 10 – Part 4 appeared first on Scripting Blog.

PowerTip: Use New-Alias to make Cmdlets easier to remember

$
0
0

Summary: Using New-Alias to create easier to remember shortcuts to Cmdlets in PowerShell

A picture containing scissors

Description automatically generated

Hey, Doctor Scripto. I know I can use Install-Module to download a DSC Resource, but is there some way to build a Cmdlet that does the Exact same job but call it Install-DSCResource? I would find that easier to remember when getting them (DSCResources).

We can’t create a new Cmdlet, but we can create an Alias. It will respond to all the same parameters as the original. To make an Alias of Install-Module that says Install-DSCResource just execute the following line.

New-Alias -Name Install-DSCResource -value Install-Module -description ‘Alias for Install-Module’

PowerShell, Doctor Scripto, PowerTip, Sean Kearney


The post PowerTip: Use New-Alias to make Cmdlets easier to remember appeared first on Scripting Blog.


Copy multi-valued Active Directory attributes from one user to another with PowerShell

$
0
0

Summary: Using -Replace parameter with Set-ADUser to copy Active Directory multi-valued attributes

Q: Hey, Doctor Scripto!

We are in the middle of an Active Directory migration and need to copy the multi-valued attribute “ProxyAddresses” from old user accounts to new ones. Can you do with a few lines of code?

—ND

A: Hello ND,

Hello everyone, your good friend Doctor Scripto is here with Walid, one of our PFEs who really likes mixing PowerShell with Active Directory. Walid, what do you think of this one?

Well, Doctor Scripto, it makes a lot of sense to try and automate this type of tasks. Who likes to manually copy information from one place to another for a whole night?

The Active Directory module for PowerShell has a command called Set-ADUser, we can use the -Replace parameter to provide new values of any attribute, like ProxyAddresses for example. The -Replace parameter takes a hashtable, so we can use it to enter several attributes at once. See example below,

Set-ADUser -Identity "MyTestUser" -Replace @{ Title = "CEO" Description = "Chief Executive Officer" }

This will replace what ever value in the Title and Description attributes with the information above.

Now, when it comes to multi-valued attributes, we can use the -Replace, but fort the value, we need to provide an array. See this example,

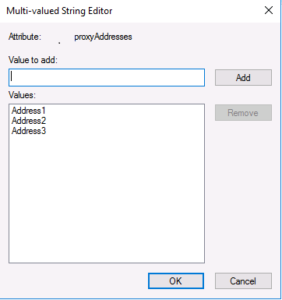
Set-ADUser -Identity "MyTestUser" -Replace @{ ProxyAddresses = @("Address1","Address2","Address3")}

Here we provided an array of strings. This is how it looks in AD,

Now to our main task, copying from one user to the another. The first step would be to get the value from the old user,

$OldUserProxyAddresses = (Get-ADUser -Identity "OldUser" -Properties "ProxyAddresses").ProxyAddresses

However, if we look at the object type of the extracted data, it is a collection, not an array. So we cannot directly use it.

One trick PowerShell has is its ability to cast a specific type, we can use this to quickly convert the ProxyAddresses into an Array using [Array] before the variable name,

Now we can use it to copy into the new user,

Set-ADUser -Identity "NewUser" -Replace ([Array] $OldUserProxyAddresses)

To sum it up, if we want to this for many users quickly we can use a CSV with a list of old and new users,

OldSamAccountName NewSamAccountName
OldUser1 NewUser1
OldUser2 NewUser2


Then use PowerShell to automate the whole process,

$UserList = Get-Content "C:\Temp\UsersToCopyProxyAddresses.CSV"

foreach ($User in $UserList)
{
     $OldUserProxyAddresses = (Get-ADUser -Identity ($User.OldSamAccountName) -Properties "ProxyAddresses").ProxyAddresses
     Set-ADUser -Identity ($User.NewSamAccountName) -Replace ([Array] $OldUserProxyAddresses)
}

That’s it, 4 lines. Hope this saves you some time ND.

So that is all there is to copying multi-valued attributes in Active Directory.  Pop by next week as we put on our detective hats to uncover a cool puzzle in Azure.

I invite you to follow me on Twitter and Facebook. If you have any questions, send email to me at scripter@microsoft.com, or post your questions on the Official Scripting Forum. See you tomorrow. Until then, peace.

Your good friend, Doctor Scripto

PowerShell, Doctor Scripto, Active Directory, Walid Moselhy


The post Copy multi-valued Active Directory attributes from one user to another with PowerShell appeared first on Scripting Blog.

PowerTip: Using Set-ADUser with multi-valued attributes

$
0
0

Summary: Using the -Replace parameter with Set-ADUser to take an array to populate multi-valued attributes

A picture containing scissors

Description automatically generated

Question: Hey Doctor Scripto, how can I use Set-ADUser to populate multivalued attributes in Active Directory?

Answer: You can use an array with the -Replace parameter to do it.

Set-ADUser -Identity “TestUser” -Replace @{ProxyAddresses = @(“Address1″,”Address2″,”Address3”)}

PowerShell, Doctor Scripto, PowerTip, Active Directory, Walid Moselhy


The post PowerTip: Using Set-ADUser with multi-valued attributes appeared first on Scripting Blog.

Use PowerShell to Identify Unassociated Azure Resources

$
0
0

Summary: Save costs by Identifying Unassociated Resources left behind after deletions in Azure

Q: Hey, Scripting Guy!

How can I quickly identify un-associated resources in my Azure subscription?

A: Hi SH!

At least you know that’s a question to ask! I myself when I first began exploring this new world didn’t realize that when deleting a virtual system in Azure, not all the associated resources are deleted with it!

First things first, if you’ve never done it, you’ll need to install the Azure PowerShell modules. This can be done by following the steps provided here on docs.microsoft.com

Install the Azure PowerShell Module

Then, log on to your subscription using:

Login-AzAccount

Once logged in, we can now use PowerShell to manage things in that mystical place called the Azure Cloud.

In my world, I discovered that network interfaces didn’t get deleted along with their VMs. And after using the web interface from my Azure portal and clicking around to figure out which ones where not associated, I said “self, there has to be a better way!” And so, there was.

Get-AZNetworkInterface

If you just ran that command, like me, you likely have a plethora of text on your screen! So let’s narrow it down.

Get-AzNetworkInterface | Select-Object name, virtualmachine

And there it is. I now know which Network Interface resources are not associated with a virtual machine!

So, if I want to remove those excess ones, I can do:

Get-AzNetworkInterface | Where-Object { $_.virtualmachine -eq $null } | Remove-AzNetworkInterface

A few confirms later (or if I don’t want to validate just add -force), the unassociated Network Interfaces have been removed from my resource group!

So, let’s take it a step further!

Get-AzDisk | Select-Object name,managedby

Where “ManagedBy” is empty, these are unallocated disk, and if you know about Azure, as much as storage costs are cheap, they’re not free!

So this time:

Get-AzDisk | Where-Object { $_.ManagedBy -eq $null } | Remove-AzDisk

And done, left over disks from previous system builds are gone.

So, Get-Az* is a great way to help me clean up my resources, but each one needs a tiny bit of a different approach. For Network Interfaces, I looked for $null on Virtual Machines. For Disks, I sought out $null on ManagedBy and for Network Security Groups:

Get-AZNetworkSecurityGroup | Where-Object { $_.NetworkInterfaces.count -eq 0 } | Select-Object name

Yep, here we look for the number of Network Interfaces the Network Security Group is associated to because an empty array is still an object rendering $null useless in this situation.

As your Azure resource group grows, keeping it clean is both good practice and economical. Hopefully this will help you do that with a few less gray hairs and a bit less late night clicking. Happy PowerShelling!

Patrick Mercier, PFE

So that is all there is to copying multi-valued attributes in Active Directory.  Pop by next week as we put on our detective hats to uncover a cool puzzle in Azure.

I invite you to follow me on Twitter and Facebook. If you have any questions, send email to me at scripter@microsoft.com, or post your questions on the Official Scripting Forum. See you tomorrow. Until then, peace.

Your good friend, Doctor Scripto

PowerShell, Doctor Scripto, Azure, Patrick Mercier


The post Use PowerShell to Identify Unassociated Azure Resources appeared first on Scripting Blog.

PowerTip: Identify if CredentialGuard is enabled with Windows PowerShell

$
0
0

Summary: Easily identify if Credential Guard is enabled using the Get-ComputerInfo Cmdlet in Windows 10

A picture containing scissors Description automatically generated

Question: Hey Doctor Scripto, how can I tell if CredentialGuard has been enabled on my Windows 10 computer?

Answer: Just use the Get-ComputerInfo Cmdlet and target the DeviceGaurdSecurityServicesConfigured property. The following line will produce a Boolean $TRUE if it is enabled.

‘CredentialGuard’ -match ((Get-ComputerInfo).DeviceGuardSecurityServicesConfigured)

PowerShell, Doctor Scripto, PowerTip, Credential Guard, Paul Greeley


The post PowerTip: Identify if CredentialGuard is enabled with Windows PowerShell appeared first on Scripting Blog.

Testing RPC ports with PowerShell (and yes, it’s as much fun as it sounds!)

$
0
0

Summary: Using PowerShell to identify RPC ports in use by capturing content from Dos Commands like PortQRY.exe

We’d like to introduce you today to one of our newest bloggers!  It’s a froopingly awesome friend of ours, Joel Vickery, PFE.  (did I mention Dr. Scripto is a big fan of books written by Douglas Adams?….oops!)

Take it away Joel!

Thanks Doc!  So hey everybody!

What do you do when you have to troubleshoot the dreaded “RPC Unavailable” error 1722, which rears its ugly head anywhere from Active Directory replication to Configuration Manager Distribution Point installations, and many other places in between?

Example of the Error 1722 RPC Server Unavailable in the wild

To help prevent this from becoming a blame pointing cage match between the System Admins and the Network Folks (we all know the Sys Admins would win anyway), I’m writing this post to help put some structure around troubleshooting this type of issue so that you have more facts to take to the conversation. “I think it’s a firewall issue” doesn’t get you very far in my experience.

RPC communication is one of the tougher firewall problems since most firewall folks want to know exactly which ports you need open.  With RPC, they get a range of ports from 49152 to 65535.  There are usually predefined rules on firewalls, WAN accelerators, and the various devices that traffic hops through to get to its destination.  They do not always work as planned.

To give you the simplest example I can think of, RPC sort of works like the concierge desk at a hotel.  You walk up and ask the person at the desk for the information about services at the hotel, like the gym or the swimming pool.  In our scenario, that person at the desk is RPC Endpoint Mapper on port 135 and they direct you to the services that are listening on the ephemeral ports. I’m just barely breaking the surface on RPC in this post.  If you want to get the full picture, take a look at what, in my opinion, is the best explanation about how RPC works in gory detail, written by Ned Pyle (and his dogs) at the link below: https://blogs.technet.microsoft.com/askds/2012/01/24/rpc-over-itpro/ I see a lot of administrators attempting to diagnose this network connectivity by looking up the RPC ports (135 & 49152-65535) and then attempting to connect to random ports in the ephemeral range, hopefully this post will help with isolating the ports that are truly listening on the server.

Getting the ports

The way I normally troubleshoot this type of network connectivity is with the SysInternals PortQry.exe utility, which can be downloaded from the Microsoft website. To begin, run the following command to query the RPC Port Mapper on the remote machine, this will return the ports in the ephemeral range that the machine is actively listening on for RPC services:

Portqry.exe -n 169.254.0.10 -e 135

(PARTIAL OUTPUT BELOW)

Querying target system called:

 169.254.0.10

Attempting to resolve IP address to a name…

IP address resolved to DC1.contoso.com

querying…

TCP port 135 (epmap service): LISTENING

Using ephemeral source port

Querying Endpoint Mapper Database…

Server’s response:

UUID: d95afe70-a6d5-4259-822e-2c84da1ddb0d

ncacn_ip_tcp:169.254.0.10[49664]

UUID: 50abc2a4-574d-40b3-9d66-ee4fd5fba076

ncacn_ip_tcp:169.254.0.10[64555]

UUID: 897e2e5f-93f3-4376-9c9c-fd2277495c27 Frs2 Service

ncacn_ip_tcp:169.254.0.10[64528]

UUID: 367abb81-9844-35f1-ad32-98f038001003

ncacn_ip_tcp:169.254.0.10[64502]

UUID: c9ac6db5-82b7-4e55-ae8a-e464ed7b4277 Impl friendly name

ncacn_ip_tcp:169.254.0.10[49668]

UUID: 12345778-1234-abcd-ef00-0123456789ac

ncacn_ip_tcp:192.168.0.242[49668]

The output from this command will have an almost overwhelming amount of output.  Within this mountain of data will be just a handful of high-numbered ephemeral ports on which the server is listening.  You are looking for any lines that have “ip_tcp” in them and the ports are in brackets at the end of the line (highlighted in blue above).  This is where we will get a focused list of listening ports from the RPC server to query and validate connectivity. In the abbreviated example above, ports 49664 , 64555, 64502,and 49668 are listening.  Note that 49668 is listed twice.  There will be duplicates that you will have to filter out.

Once you have the full (and de-duplicated) list put together, you can then feed that list of ports back into PORTQRY.EXE to validate that they are reachable over the network. About now, you are probably saying to yourself that’s a  lot of work!  Never fear, I didn’t do this too many times before I decided to automate it in PowerShell.

(Editor.  Queue up Mighty Mouse and “Here I come to save the DAY!”)

RPCCheck.ps1 to the rescue!

# This Sample Code is provided for the purpose of illustration only and is not intended to be used in a production environment.
# THIS SAMPLE CODE AND ANY RELATED INFORMATION ARE PROVIDED "AS IS" WITHOUT WARRANTY OF ANY KIND, EITHER EXPRESSED OR IMPLIED, INCLUDING BUT NOT LIMITED TO THE IMPLIED WARRANTIES OF MERCHANTABILITY AND/OR
# FITNESS FOR A PARTICULAR PURPOSE.
#
#
# Script queries port 135 to get the listening ephemeral ports from the remote server
#  and verifies that they are reachable.
#
#
#  Usage:  RPCCheck -Server YourServerNameHere
#
#
#  Note:  The script relies on portqry.exe (from Sysinternals) to get port 135 output.
#  The path to portqry.exe will need to be modified to reflect your location
#
Param(
[string]$Server
)
#  WORKFLOW QUERIES THE PASSED ARRAY OF PORTS TO DETERMINE STATUS
workflow Check-Port {
param ([string[]]$RPCServer,[array]$arrRPCPorts)
$comp = hostname

ForEach -parallel ($RPCPort in $arrRPCPorts)
{
$bolResult = InlineScript{Test-NetConnection -ComputerName $Using:RPCServer -port $Using:RPCPort _
-InformationLevel Quiet}
If ($bolResult)
{
Write-Output "$RPCPort on $RPCServer is reachable"
}
Else
{
Write-Output "$RPCPort on $RPCServer is unreachable"
}
}
}
#  INITIAL RPC PORT
$strRPCPort = "135"
#  MODIFY PATH TO THE PORTQRY BINARY IF NECESSARY
$strPortQryPath = "C:\Sysinternals"
#  TEST THE PATH TO SEE IF THE BINARY EXISTS
If (Test-Path "$strPortQryPath\PortQry.exe")
{
$strPortQryCmd = "$strPortQryPath\PortQry.exe -e $strRPCPort -n $Server"
}
Else
{
Write-Output "Could not locate Portqry.exe at the path $strPortQryPath"
Exit
}
#  CREATE AN EMPTY ARRAY TO HOLD THE PORTS RETURNED FROM THE RPC PORTMAPPER
$arrPorts = @()
#  RUN THE PORTQRY COMMAND TO GET THE EPHEMERAL PORTS
$arrQuryResult = Invoke-Expression $strPortQryCmd
# CREATE AN ARRAY OF THE PORTS
ForEach ($strResult in $arrQuryResult)
{
If ($strResult.Contains("ip_tcp"))
{
$arrSplt = $strResult.Split("[")
$strPort = $arrSplt[1]
$strPort = $strPort.Replace("]","")
$arrPorts += $strPort
}
}
#  DE-DUPLICATE THE PORTS
$arrPorts = $arrPorts | Sort-Object |Select-Object -Unique
#  EXECUTE THE WORKFLOW TO CHECK THE PORTS
Check-Port -RPCServer $Server -arrRPCPorts $arrPorts

Notes

Some things to note regarding the script:  It uses PortQry, so make sure you have that installed.  You’ll have to tell the script where the PortQry.exe binary is located by modifying the path on this line of the script: $strPortQryPath = “C:\Sysinternals” Also, the script requires PowerShell v4 since it was written to use WorkFlow and Test-NetConnection, which requires PowerShell v3 & PowerShell v4 respectively.  (PortQry.exe is Free solution you can download from www.sysinternals.com)

Finally

At the end of all of this, our family lion of a house cat (rescued from the Humane Society by the way), Roger, was very impressed. You can just imagine in on his face. Ned, in the off chance that you read this, I’m a dog person all the way, but the daughter wanted a cat.  If it helps, I asked for the “most dog-like” cat they had, and Roger doesn’t disappoint.

So that is all there is to pinging available RPC ports with PowerShell and cool Sysinternals tool!  Pop by next week as we into some amazing work with PowerShell and Parallel processes!

I invite you to follow me on Twitter and Facebook. If you have any questions, send email to me at scripter@microsoft.com, or post your questions on the Official Scripting Forum. See you tomorrow. Until then, Keep on Scripting!

Your good friend, Doctor Scripto

PowerShell, Doctor Scripto, Sysinternals, Joel Vickery, RPC, Ping

The post Testing RPC ports with PowerShell (and yes, it’s as much fun as it sounds!) appeared first on Scripting Blog.

PowerTip: Use Windows PowerShell to display all Environment variables

$
0
0

Summary: Doctor Scripto demonstrates how to use [System.Environment] to show all currently set environment variables

A picture containing scissors

Description automatically generated

Question: Hey Doctor Scripto, I remember in DOS if I wanted to see the values of all the Environment variables; like TEMP I could just type the SET Command. How do I do this in PowerShell?

Answer: You can do this in one line using [System.Environment] to display all of the currently set Environment variables.

[System.Environment]::GetEnvironmentVariables()

PowerShell, Doctor Scripto, PowerTip, Sean Kearney


The post PowerTip: Use Windows PowerShell to display all Environment variables appeared first on Scripting Blog.

Parallel Processing with jobs in PowerShell

$
0
0

Hello everyone!  Doctor Scripto is elated to present some more great content from Joel Vickery, PFE , today he discusses using jobs in PowerShell.   Stay tuned in the upcoming weeks for some amazing regular content.   Take it away Joel!

I have to be honest, back in 2010 I was firmly entrenched in VBScript and had no interest in learning anything new.  Then fate threw me a curve ball when I was presented with a task to fix over 9,000 workstations that had lost their “parent” antivirus server.  Each machine needed to have the exact same set of commands executed on it, a new file copied and service restarted, to fix them so I created a quick  VBScript to connect to each machine and perform the fix actions. The only bad part about this script was that it took days to run against the machines, processing each one sequentially in a For loop before moving on to the next. I did some research on multi-threading with VBScript and kept getting results that referred to PowerShell “jobs”, which gave me the motivation to start learning PowerShell.

For those of you who come from a Unix or Linux background, jobs will be a familiar concept since you can background any command by placing an “&” at the end of the command.  PowerShell Cmdlets sometimes include the “-AsJob” parameter that will allow the command to submitted in the background, releasing the console to be used for other commands. Alternatively, you can use the Start-Job CmdLet to run commands as Jobs. This also means that you can submit multiple jobs in the background and continue processing without waiting for each job to complete.  Keep in mind that there are limits to everything so keep your machine’s resource consumption in mind as you test this concept out.  Submitting a large number of background commands could be resource intensive.

Below are two different ways to do a WMI Query as a job:

Get-WMIObject Win32_OperatingSystem -AsJob

Or

Start-Job {Get-WMIObject Win32_OperatingSystem}

These jobs do all of their processing in the background and store the output until you receive them.  You can check on the status of a job by running Get-Job, the status is in the “State” column, which will show if the command is Running, Completed, or Failed.  Also notice the HasMoreData column.  This indicates that there is output to be retrieved from the job.  In the example output below, notice that the job is still running.

After the job has been kicked off, you can check on the status of the job by running the Get-Job command, noting the State and HasMoreData values. The State will change to Completed when the job has finished and the  HasMoreData value will indicate if there is output.

Get-Job

Once the job has completed, you can use the Receive-Job cmdLet to get the data from the command.

Receive-Job -Id 3       # NOTE, you could also do -Name Job3 here, either will work

The output of the command is now delivered to the console:

Note that the HasMoreData value has now changed to False after running the Receive-Job command:

The important thing to remember here is that you have one chance to get the information from the job so make sure that you capture it in a variable if the output needs to be evaluated.

$JobOutput = Receive-Job -Id 1

Once you are done getting the job’s output, the job will basically hang out there until you remove it by running the Remove-Job Cmdlet.

Remove-Job -Id 1

As you can tell, there are a lot of moving parts to this.

The PowerShell script that I created to address the antivirus client remediation task had to have a mechanism to control how many jobs I could submit at a time, as well as constant monitoring of the queue to receive input from the completed jobs, remove them, and refill the queue with new jobs.

To top it off, once I finished processing the queue of items, I had to write some code to wait for the last batch of jobs was completed to make sure that I received the output from all of them.

That is a lot of overhead. Fast forward to today and we have PowerShell WorkFlows that make this process much easier to manage which I’ll cover in another post.

So that is all there is to with basic PowerShell jobs!  Pop by next week as we look into some introductory work with PowerShell Workflows!

I invite you to follow me on Twitter and Facebook. If you have any questions, send email to me at scripter@microsoft.com, or post your questions on the Official Scripting Forum. See you tomorrow. Until then, Keep on Scripting!

Your good friend, Doctor Scripto

PowerShell, Doctor Scripto, Joel Vickery, Jobs


The post Parallel Processing with jobs in PowerShell appeared first on Scripting Blog.


PowerTip: Identify Completed PowerShell Jobs with Data yet to be Received

$
0
0

Summary: Doctor Scripto quickly shows how to identify Completed Jobs in PowerShell which have yet to have the data Received

Hey Doctor Scripto, How can I identify jobs which already completed but I haven’t done a Receive-Job on to get the data?

You can do this with the Get-Job Cmdlet by targeting the -ChildJobState and -HasMoreData like the following example

Get-Job -ChildJobState Completed -HasMoreData:$True

PowerShell, Doctor Scripto, PowerTip, Sean Kearney

The post PowerTip: Identify Completed PowerShell Jobs with Data yet to be Received appeared first on Scripting Blog.

Just go with the flow…. WorkFlow that is with Windows PowerShell

$
0
0

Doctor Scripto returns again with our good friend Joel Vickery, PFE who is going to touch on the use of Workflows In PowerShell.

Take it away Joel!

Following up on my original post Parallel Processing with jobs in PowerShell, I wanted to go into another method of running parallel processes in PowerShell, namely WorkFlows. WorkFlow is very similar to using the Start-Job/-asJob functionality but it has some distinct advantages that are fully covered in many other blog postings on TechNet.  I’ll mention them quickly below, but if you want deeper detail, see the When Windows PowerShell Met WorkFlow blog posting on MSDN. Finally, I wanted to focus on how PowerShell handles the activity of Workflow from a process/thread perspective so that you can factor in the way that processing workflows works into your decision to use it over other parallel and multi-threading methods. I started this set of posts with the thought “I wonder which one of these methods is the fastest?” so I will include that information as well.

The Great Parts

(Not) Managing the Queue

WorkFlow takes some of the overhead of managing the jobs away.  If you have worked with PowerShell Jobs, it doesn’t take long to realize that you have a lot of work to do to manage the submission, monitoring, retrieval, and removal of the jobs.

Unique Processing Control

WorkFlow also adds some unique controls for how commands within the workflow execute:

Parallel

Commands that are contained within a Parallel block will run concurrently, meaning that each command does not wait until it is complete before running the next command in the Parallel Block.

Sequence

Commands within a Sequence block will execute each command and wait for the command to complete before running the next command.

Checkpoints

Workflow scripts that are interrupted can be resumed even through a reboot.

The Tough Parts

Restrictions

All good things come at a price.  With WorkFlows, there are restrictions that you need to be aware of that take this from a simple exercise to an intermediate-level development effort.  I struggled with issues like changing parameters and scoping of variables as well as the lack of support for invoke-command.  Like any learning experience, once you get the hang of it, you’ll be cranking out WorkFlow code like second nature.

Debugging

Debugging WorkFlows in earlier releases of PowerShell was a challenge since the PowerShell_ISE would lose insight into the processes when they would execute in parallel. This was corrected in PowerShell v4.0, which allows full control of the code within the WorkFlow block, to include setting breakpoints.

Example Script

The script below queries AD for all computers and then, using a WorkFlow, gets the most recent 4000 event 4624 events from the security event log.  Since I am using the “-parallel” switch on the foreach loop, querying each of the computers will happen concurrently.  I will be adding more posts beyond this one and will use the exact same basic script in the future posts, just wrapped in a different parallel processing wrapper.

workflow Test-WF
{
     param([array[]]$ServerList)
    $ReturnArr = @()
foreach -parallel -ThrottleLimit 10 ($Server in $ServerList)
{
    $returnName = $Server
        $strCompName = $Server.Name
        $Count = InlineScript { (Get-Eventlog Security -ComputerName $Using:returnName -Newest 4000| '
Where-Object {$_.EventID -eq '4624'}).count}
$Workflow:ReturnArr += "$returnName,$Count"
}
     $ReturnArr
}
$arrComputers = (get-adcomputer -filter * -server dc1.contoso.com:3268).Name
Get-date
$Stats = Measure-Command -Expression {$OutTest = Test-WF -ServerList $arrComputers}
Get-date
$outTest
$Stats

Process Analysis

I have to admit that I made a mistake here, but it turned out to be a good thing since it pointed out an efficiency and performance issue that you can encounter depending how you implement your script.  My initial script had an InlineScript Activity on the line of code that queries the event log and that turned out to be an important factor in how efficient and fast this script is. To get a good idea of what is happening behind the scenes, I’m using ProcMon from the Sysinternals Suite to record the process tree that results from the WorkFlow.  In my small test lab environment, I have 8 domain controllers and a general tools server, so 9 machines that are returned from the query against AD and then will each be contacted to parse the event logs. In the screen capture above, you will notice that the initial script was started in the PowerShell_ISE, which then created several additional PowerShell.exe processes, each with their own Process ID.

In the screen capture below from ProcMon, you can see the PowerShell_ISE.exe creating the final Processes and worker threads to go forth and get the information that we have requested.  It’s becoming very clear through this capture that WorkFlows, much like Start-Jobs/-asJob are “multi-process”, not truly multi-threaded.

It turns out that this is due to the fact that I used the InlineScript activity, which run in their own process.  Just something to keep in mind if resources are an issue and you cannot afford the overhead of multiple PowerShell.exe processes running.

Finally, in the screen capture below, the newly created processes are querying the security event logs in parallel. To be thorough, I went back and modified the script without the use of the InlineScript activity, instead using the direct Get-EventLog call against the remote servers.  I changed the line: $Count = InlineScript { (Get-Eventlog Security -ComputerName $Using:returnName -Newest 4000| ‘ Where-Object {$_.EventID -eq ‘4624’}).count} to: $Count =(Get-Eventlog Security -ComputerName $Using:returnName -Newest 4000| ‘ Where-Object {$_.EventID -eq ‘4624’}).count

Now I am seeing the single PowerShell.exe with multiple threads that I was expecting.

Performance

To give a quick frame of reference, I ran a regular sequential ForEach loop against all of these same domain controllers and the sequential PowerShell loop took 1 minute and 23 seconds to complete the retrieval of events from the DCs. In the output below, you can see that WorkFlow with InlineScript beats that time by a considerable margin at 39 seconds.

Performance took a hit with the InlineScript activity removes when compared to the multi-process, dropping to 1 minute and 17 seconds.  It was still faster than the sequential loop but not by a lot.

Conclusion

As you start using these parallel capabilities in PowerShell, it’s important to think about the correct use case for the particular parallel processing capability.  For WorkFlows using the InlineScript activity, you have to make sure that you have the resources to handle having multiple full PowerShell.exe environments running, including memory and CPU utilization.  Without InlineScript, resource consumption is less of an issue and the script will run in a true multithreading mode.   I tend to use Workflows when I have a decent amount of time to create a workable script, and I need the performance increase, and I know I’ll be collecting dividends on the time spent when compared to a simple sequential loop.

So that is all there is to with our quick introduction to PowerShell workflows!  Pop by next week as we look into PowerShell Workflows a little bit deeper with Joel !

I invite you to follow me on Twitter and Facebook. If you have any questions, send email to me at scripter@microsoft.com, or post your questions on the Official Scripting Forum. See you tomorrow. Until then, Keep on Scripting!

Your good friend, Doctor Scripto

PowerShell, Doctor Scripto, Joel Vickery, Workflows

The post Just go with the flow…. WorkFlow that is with Windows PowerShell appeared first on Scripting Blog.

Viewing all 117 articles
Browse latest View live


<script src="https://jsc.adskeeper.com/r/s/rssing.com.1596347.js" async> </script>