 How can I use Windows PowerShell to enumerate all certificates on my Windows computer?
 If you have Windows 7 or later, you can user the Get-ChildItem cmdlet to enumerate all certificates on a local system. For example:


How can I use Windows PowerShell to enumerate all certificates on my Windows computer?
If you have Windows 7 or later, you can user the Get-ChildItem cmdlet to enumerate all certificates on a local system. For example:
Summary: Hi everyone, Dan Franciscus here. I’m a systems engineer and freelance technical writer based out of New Jersey. My expertise is in Windows Server, PowerShell, VMware, and Puppet. Puppet is an infrastructure platform that helps automate your environment. While Puppet has a large Linux user base, it also supports the configuration of Windows systems.
---------------
Normally, it’s preferable to use specific Puppet and DSC Windows modules to manage systems in Puppet, but an alternative is running PowerShell commands and scripts by using the exec resource. This can be helpful for transitioning existing PowerShell code into Puppet quickly.
The exec resource allows you to execute shell commands on your nodes. Fortunately, Puppet also allows users to change the provider used for the exec resource to PowerShell, so that Windows Puppet nodes will run PowerShell commands.
For instance, in this example manifest, I want to run a PowerShell command that adds the string “Hello” to the contents of a text file (“C:\test.txt”) for my Puppet node (“Test-1”).
node ‘Test-1' {
exec { 'SETHELLO':
command => 'Add-Content -Path c:\test.txt –Value “Hello”’,
logoutput => true,
provider => powershell,
}
}
The three parameters I use in this manifest are command, logoutput and provider. The command parameter is the PowerShell code you want to run on your node. The logoutput parameter just logs the output to the console. Finally, provider is necessary to declare that PowerShell is the shell to use in this resource, instead of BASH by default.
When I run puppet agent on my Test-1 node, I get this output:
PS C:\> puppet agent --test
Info: Retrieving pluginfacts
Info: Retrieving plugin
Info: Loading facts
Info: Caching catalog for Test-1
Info: Applying configuration version '1524181853'
Notice: /Stage[main]/Main/Node[Test-1 ]/Exec[SETHELLO]/returns: executed successfully
Notice: Finished catalog run in 1.91 seconds
If I run Get-Content on c:\test.txt, I see Puppet did its job by adding “Hello”:
PS C:\> Get-Content C:\test.txt
Hello
You can see from the output, Puppet ran the Add-Content command successfully. This is fine, but with configuration management we usually want to make our configurations idempotent. In other words, we want the same effect on a node each time we run it, regardless of how many times. In this case, I only want “Hello” to be added to c:\test.txt when it does not already exist in the file. To make this resource idempotent, I will use the unless parameter in my manifest. In the unless parameter, I will look into the file with Select-String to see if the “Hello” string is present. If it is not present, Puppet adds “Hello” to c:\test.txt with Add-Content.
node 'puppetagent-win' {
exec { 'SETHELLO':
command => 'Add-Content -Path c:\test.txt -Value "Hello"',
unless => 'if (!(Select-String -Path c:\test.txt -Pattern "Hello")){exit 1}',
logoutput => true,
provider => powershell,
}
}
There is an alternative to the unless parameter. You can use onlyif, which only runs what is in the command parameter if the command in onlyif returns an exit code of 0.
Now on my node, I first illustrate that there is nothing in the contents of c:\test.txt by setting the value to $Null:
PS C:\> Set-Content -Value $Null -Path C:\test.txt
PS C:\> Get-Content -Path C:\test.txt
PS C:\>
Next, I run puppet agent, which adds the “Hello” string to c:\test.txt since Select-String does not find it:
PS C:\> puppet agent --test
Info: Retrieving pluginfacts
Info: Retrieving plugin
Info: Loading facts
Info: Caching catalog for Test-1
Info: Applying configuration version '1524332621'
Notice: /Stage[main]/Main/Node[Test-1 ]/Exec[SETHELLO]/returns: executed successfully
Notice: Finished catalog run in 2.97 seconds
As you can see with Get-Content, Puppet added the “Hello” string to c:\test.txt:
PS C:\> Get-Content –Path C:\test.txt
Hello
Finally, if I run puppet agent on the node again, nothing is done. This is because the unless parameter has an exit code of 0, meaning “Hello” was found in c:\test.txt:
PS C:\> puppet agent --test
Info: Retrieving pluginfacts
Info: Retrieving plugin
Info: Loading facts
Info: Caching catalog for Test-1
Info: Applying configuration version '1524333018'
Notice: Finished catalog run in 1.89 seconds
PS C:\> Get-Content -Path C:\test.txt
Hello
I hope this gives you some insight into how to use PowerShell with Puppet to manage and automate the configuration of your Windows systems. For more information on using Puppet with Windows, you can visit puppet.com and view their 9-part webinar series.
Dan Franciscus, guest blogger
You can follow him on Twitter or read his blog here.
Summary: Use Windows PowerShell to access the Cognitive Services Text-to-Speech API.
Q: Hey, Scripting Guy!
I was reading up on how we could use PowerShell to communicate with Azure to gain an access token. I’ve been just itching to see how we can use this! Would you show us some examples of this in use in Azure?
—TL
A: Hello TL, I would be delighted to! This is a cool way to play with PowerShell as well!
If you remember from the last post, when we authenticated with the following lines to Cognitive Services, it returned a temporary access token.
Try
{
[string]$Token=$NULL
# Rest API Method
[string]$Method='POST'
# Rest API Endpoint
[string]$Uri=' https://api.cognitive.microsoft.com/sts/v1.0/issueToken'
# Authentication Key
[string]$AuthenticationKey='13775361233908722041033142028212'
# Headers to pass to Rest API
$Headers=@{'Ocp-Apim-Subscription-Key' = $AuthenticationKey }
# Get Authentication Token to communicate with Text to Speech Rest API
[string]$Token=Invoke-RestMethod -Method $Method -Uri $Uri -Headers $Headers
}
Catch [System.Net.Webexception]
{
Write-Output 'Failed to Authenticate'
}
The token was naturally stored in the object $Token, so it was easy to remember. I suppose we could have named it $CompletelyUnthinkableVariableThatIsPointless, but we didn’t. Because we can use pretty descriptive names in PowerShell, we should. It makes documenting a script easier.
Our next task is to open up the documentation on the Cognitive Services API to see what information we need to supply. We can find everything we need to know here.
Under “HTTP headers,” we can see several pieces of information we need to supply.

X-Microsoft-OutputFormat is the resulting output for the file returned.
There are many industry standard types we can use. You’ll have to play with the returned output to determine which one meets your needs.
I found that ‘riff-16khz-16bit-mono-pcm’ is the format needed for a standard WAV file. I chose WAV specifically because I can use the internal Windows services to play a WAV file, without invoking a third-party application.
We’ll assign this to an appropriately named object.
$AudioOutputType='riff-16khz-16bit-mono-pcm'
Both X-Search-AppId and X-Search-ClientID are just unique GUIDs that identify your application. In this case, we’re referring to the PowerShell script or function we’re creating.
The beautiful part is that you can do this in PowerShell right now, by using New-Guid:

If you’d like to be efficient and avoid typing (well, unless you do data entry for a living and you need to type it…I once had that job!), we can grab the Guid property and store it on the clipboard.
New-Guid | Select-Object -ExpandProperty Guid | Set-Clipboard
But the GUID format needed by the REST API requires only the number pieces. We can fix that with a quick Replace method.
(New-Guid | Select-Object -ExpandProperty Guid).replace('-','') | Set-Clipboard
Run this once for each property, and paste it into a well-descriptive variable, like so:
$XSearchAppID='dccd93ecb3cf4535aac9350c9b5fb2f8'
$XSearchClientID='45b403b6ae0d4f9ca13ca05f61a58ab2'
UserAgent is just a unique name for your application. Pick a unique but sensible name.
$UserAgent='PowerShellTextToSpeechApp'
Finally, Authorization is that token that was generated earlier, and is stored in $Token.
At this point, we put the headers together. Do you remember the last headers from authentication? It was small, but the format is the same.
$Headers=@{'Ocp-Apim-Subscription-Key' = $AuthenticationKey }
You can string it all together like this:
$Headers=@{'Property1'='Value';'Property2'='Value';'Property3'='Value';'Property4'='Value';}
But as you add more information, it becomes too unreadable for others working on your script. This is a great case for using backticks ( ` ) to separate the content out. Every time I think about backticks, I think of Patrick Warburton as “The Tick.”
Here is an example with the same information, spaced out with a space and then a backtick.
$Headers=@{ `
'Property1'='Value'; `
'Property2'='Value'; `
'Property3'='Value'; `
'Property4'='Value'; `
}
Let’s populate the values for our header from the examples I provided earlier in this page.
$AudioOutputType='riff-16khz-16bit-mono-pcm'
$XSearchAppID='dccd93ecb3cf4535aac9350c9b5fb2f8'
$XSearchClientID='45b403b6ae0d4f9ca13ca05f61a58ab2'
$UserAgent='PowerShellTextToSpeechApp'
$Header=@{ `
'Content-Type' = 'application/ssml+xml'; `
'X-Microsoft-OutputFormat' = $AudioOutputType; `
'X-Search-AppId' = $XSearchAppId; `
'X-Search-ClientId' = $XSearchClientId; `
'Authorization' = $AccessToken `
}
With the header populated, we are now ready to proceed to our next major piece: actually taking text and converting it to audio content, by using Azure.
But we’ll touch upon that next time. Keep watching the blog and keep on scripting!
I invite you to follow the Scripting Guys on Twitter and Facebook. If you have any questions, send email to them at scripter@microsoft.com, or post your questions on the Official Scripting Guys Forum.
Sean Kearney, Premier Field Engineer, Microsoft
Frequent contributor to Hey, Scripting Guy!
Summary: Here’s how to make sure your errors get caught with Try Catch Finally.
Hey, Scripting Guy! I’ve been trying to use the Try Catch Finally, but some of my errors aren’t getting caught. What could be the cause?
For Try Catch Finally, you need to make sure the error defaults to a “Stop” action for the cmdlet in question. Here’s a quick example:
try
{
Get-Childitem c:\Foo -ErrorAction stop
}
catch [System.Management.Automation.ItemNotFoundException]
{
'oops, I guess that folder was not there'
}
Summary: Send and receive content to the Text-to-Speech API with PowerShell.
Q: Hey, Scripting Guy!
I was playing with the Text-to-Speech API. I have it almost figured out, but I’m stumbling over the final steps of formatting the SSML markup language. Could you lend me a hand?
—MD
A: Hello MD,
Glad to lend a hand to a Scripter in need! I remember having that same challenge the first time I worked with it. It’s actually not hard, but I needed a sample to work with.
Let’s first off remember where we were last time. We’ve accomplished the first two pieces for Cognitive Services Text-to-Speech:
Next, we need to build the body of content we need to send up to Azure. The body contains some key pieces:
For more information about all this, see the section “Supported locales and voice fonts” in Bing text to speech API.
The challenge I ran into was in just how to create the SSML content that was needed. SSML, which stands for Speech Synthesis Markup Language, is a standard for identifying just how speech should be spoken. Examples of this would be:
I could spend a lot of time reading up on it, but Azure gives you a great tool to create sample content without even trying! Check out Bing Speech, and look under the heading “Text to Speech.” In the text box, type in whatever you would like to hear.
In the sample below, I have entered in “Hello everyone, this is Azure Text to Speech.”

Now if you select View SSML (the blue button), you can see the code in SSML that would have been the body we would have sent to Azure.

You can copy and paste this into your editor of choice. From here, I will try to break down the content from our example.
<speak version="1.0" xmlns="http://www.w3.org/2001/10/synthesis" xmlns:mstts="http://www.w3.org/2001/mstts" xml:lang="en-US"><voice xml:lang="en-US" name="Microsoft Server Speech Text to Speech Voice (en-US, JessaRUS)">Hello everyone, this is Azure Text to Speech</voice></speak>
The section highlighted in GREEN is our locale. The BLUE section contains our service name mapping. The locale must always be matched with the same service name mapping from the row it came from. The double quotes are also equally important.
If you mix them up, Azure will wag its finger at you and give a nasty error back.
The section in RED is the actual content that Azure would like us to convert to speech.
Let’s take a sample from the table, and change this to an Australian female voice.

We first replace the locale with “en-AU,” and then the service name mapping with “Microsoft Server Speech Text to Speech Voice (en-AU, Catherine).”
<speak version="1.0" xmlns="http://www.w3.org/2001/10/synthesis" xmlns:mstts="http://www.w3.org/2001/mstts" xml:lang="en-AU"><voice xml:lang="en-AU" name=" Microsoft Server Speech Text to Speech Voice (en-AU, Catherine)">Hello everyone, this is Azure Text to Speech</voice></speak>
Now if we’d like to have her say something different, we just change the content in red.
How does this translate in Windows PowerShell?
We can take the three separate components (locale, service name mapping, and content), and store them as objects.
$Locale=‘en-US’
$ServiceNameMapping=‘Microsoft Server Speech Text to Speech Voice (en-US, JessaRUS)’
$Content=‘Hello everyone, this is Azure Text to Speech’
Now you can have a line like this in Windows PowerShell to dynamically build out the SSML content, and change only the pieces you typically need.
$Body='<speak version="1.0" xmlns="http://www.w3.org/2001/10/synthesis" xmlns:mstts="http://www.w3.org/2001/mstts" xml:lang="'+$locale+'"><voice xml:lang="' +$locale+'" name='+$ServiceNameMapping+'>'+$Content+'</voice></speak>'
At this point, we only need to call up the REST API to have it do the magic. But that is for another post!
See you next time when we finish playing with this cool technology!
I invite you to follow the Scripting Guys on Twitter and Facebook. If you have any questions, send email to them at scripter@microsoft.com, or post your questions on the Official Scripting Guys Forum.
Sean Kearney, Premier Field Engineer, Microsoft
Frequent contributor to Hey, Scripting Guy!
Summary: Make use of the native features of Windows through PowerShell to play sound.
Hey, Scripting Guy! I’ve got some WAV files I would love to play without launching an application. Is there a way in Windows PowerShell to do this?
You sure can! Using the System.Media.Soundplayer object, you can do this quite easily. Here is an example of how to do this:
$PlayWav=New-Object System.Media.SoundPlayer
$PlayWav.SoundLocation=’C:\Foo\Soundfile.wav’
$PlayWav.playsync()
Summary: Send and receive content to the Text-to-Speech API with PowerShell.
Q: Hey, Scripting Guy!
Could you give a buddy a hand in getting the last pieces together for the Text-to-Speech API?
—SR
A: Hello SR,
No problem at all. The last few posts, we dealt with the “Heavy Lifting” (which really wasn’t that heavy):
Now at this point, we only need to call up the REST API to have it do the magic. So just like our Authentication API, we have the following pieces:
We have the final three already. In a previous post, we built the headers (Application ID, GUID, and audio format), and we’ve just finished building the body. The authentication token is contained within the headers.
What we need to know now is the endpoint, and what Invoke-RestMethod needs. This can all be found here at Bing Text to Speech API, under the “Authorization Token” section.
The endpoint is https://speech.platform.bing.com/synthesize. To determine the method required, just glance at the “Example: voice output request.” It shows you the method as the first line.
In many REST API examples, if you see an example of the output, the first line is often the method. You can use this trick in other scenarios with REST APIs in general.
All we need to do now is assemble the pieces, and call up Invoke-RestMethod. To avoid you running back and forth, I’ve assembled the entire script:
Try
{
[string]$Token=$NULL
# Rest API Method
[string]$Method='POST'
# Rest API Endpoint
[string]$Uri='https://api.cognitive.microsoft.com/sts/v1.0/issueToken'
# Authentication Key
[string]$AuthenticationKey='13775361233908722041033142028212'
# Headers to pass to Rest API
$Headers=@{'Ocp-Apim-Subscription-Key' = $AuthenticationKey }
# Get Authentication Token to communicate with Text to Speech Rest API
[string]$Token=Invoke-RestMethod -Method $Method -Uri $Uri -Headers $Headers
}
Catch [System.Net.Webexception]
{
Write-Output 'Failed to Authenticate'
}
$AudioOutputType='riff-16khz-16bit-mono-pcm'
$XSearchAppID='dccd93ecb3cf4535aac9350c9b5fb2f8'
$XSearchClientID='45b403b6ae0d4f9ca13ca05f61a58ab2'
$UserAgent='PowerShellTextToSpeechApp'
$Header=@{ `
'Content-Type' = 'application/ssml+xml'; `
'X-Microsoft-OutputFormat' = $AudioOutputType; `
'X-Search-AppId' = $XSearchAppId; `
'X-Search-ClientId' = $XSearchClientId; `
'Authorization' = $AccessToken `
}
; New Content from this post below here ;
$Locale='en-US'
$ServiceNameMapping='Microsoft Server Speech Text to Speech Voice (en-US, JessaRUS)'
$Content='Hello everyone, this is Azure Text to Speech'
$Body=''+$Content+''
$Endpoint= 'https://speech.platform.bing.com/synthesize'
$Method='POST'
$ContentType='application/ssml+xml'
$Filename='output.wav'
Invoke-RestMethod -Uri $Endpoint -Method $Method `
-Headers $Headers -ContentType $ContentType `
-Body $Body -UserAgent $UserAgent `
-OutFile $Filename
Notice that Invoke-RestMethod has a -filename parameter, which allows you to store received output directly as a file on the file system.
When this process is complete, you will have a WAV file (which is what we chose). It can be launched in your choice of audio application.
The reason the API has regions is that it accepts text in a local language (such as French). If you target the appropriate region, the speaking voice is tuned to speak with the appropriate accent and inflections of the text.
Pretty cool, eh? If you’re tripping over any of the pieces, don’t forget to review the earlier four parts of this series to get it all ironed out!
That’s all for the moment, but keep a lookout for more in the way of PowerShell here.
I invite you to follow the Scripting Guys on Twitter and Facebook. If you have any questions, send email to them at scripter@microsoft.com, or post your questions on the Official Scripting Guys Forum.
Sean Kearney, Premier Field Engineer, Microsoft
Frequent contributor to Hey, Scripting Guy!
Summary: Identify your PowerShell environment by making use of built-in PowerShell variables.
Hey, Scripting Guy! If I’m writing a script, how can I detect if I am running on Windows, Linux, or Mac with PowerShell?
Just use the built-in variable $PSVersionTable, which has all of the properties you’ll need. Here is an example:
# Currently operating version
$PSVersionTable.PSVersion
# Current Host operating System
# If this value is $NULL you are currently running Windows PowerShell 5.x
# else it returns the host environment from the open Source release
$PSVersionTable.OS
Summary: Having some fun with Abbott and Costello’s “Who’s on first?” comedy routine, and multiple voices with Bing Speech.
-------------------------------
Hello everyone!
The last few posts, I showed you all about the Cognitive Services Text-to-Speech API. You learned about the process to authenticate with Windows PowerShell.
It was also a great showcase for Invoke-RestMethod, as it demonstrated how REST API services are accessible with no real code for the IT professional.
Today, as an IT pro, I’m just going to have some fun. Sometimes that’s the best way to learn how to code.
Initially, all of this came about as a challenge from other members of “Hey, Scripting Guy!” I demonstrated a silly little script I wrote to play Abbott and Costello’s most famous comedy sketch, “Who’s on first?” with the internal voices in Windows. It’s a neat trick many PowerShell people love to play with like this.
# Establish to the Voice Comobject
$voiceAPI=New-Object -comobject SAPI.SPVoice
# Speed up the rate of the Speaker's voice
$voiceAPI.Rate=3
I proceeded to get the voices, and then depending on who’s name (yes, that’s his name), I found I would pick a voice in Windows.
# Obtain the list of voices in Windows 10
$voiceFont=$voiceAPI.GetVoices()
# Establish a table to match the Microsoft voices with the names of the comedians
$nameMatch=@{'Abbott:' = 'ZIRA'; 'Costello:' = 'DAVID' }
So it was neat. I had the text file on the hard drive, and it was all fun and games.
Some people said, “Cool, but you should try the same approach with Cognitive Services!”
It was at this point I read and learned everything I showed you in the last several posts. Today we’re going to have some fun: “Who’s on first?” portrayed by the “Azure Cognitive Services Players.”
Challenge #1 – Learn how to use Text-to-Speech in Azure. Accomplished, and built a function to leverage it. I’ve prepopulated all of the available sound file options, so I could just select from an array in this function.
Function Invoke-AzureTextToSpeech($Region,$Voice,$Content,$Filename)
{
# Obtain Access Token to communicate with Voice API
# I erased mine, you'll have to get your own ;)
$APIKey='00000000000000000000000000000000'
$AccessToken=Invoke-RestMethod -Uri "https://api.cognitive.microsoft.com/sts/v1.0/issueToken" -Method 'POST' -ContentType 'application/json' -Headers @{'Ocp-Apim-Subscription-Key' = $APIKey }
# Generate GUID for Access
# Just use this Cmdlet to generate a new one (New-Guid).tostring().replace('-','')
$XSearchAppId='00000000000000000000000000000000'
# Just use this Cmdlet to generate a new one (New-Guid).tostring().replace('-','')
$XSearchClientId='00000000000000000000000000000000'
# Current list of Audio formats for Azure Text to Speech
# HTTP Headers X-Microsoft-OutputFormat
# https://docs.microsoft.com/en-us/azure/cognitive-services/speech/api-reference-rest/bingvoiceoutput
#
$AudioFormats=( `
'ssml-16khz-16bit-mono-tts', `
'raw-16khz-16bit-mono-pcm', `
'audio-16khz-16kbps-mono-siren', `
'riff-16khz-16kbps-mono-siren', `
'riff-16khz-16bit-mono-pcm', `
'audio-16khz-128kbitrate-mono-mp3', `
'audio-16khz-64kbitrate-mono-mp3', `
'audio-16khz-32kbitrate-mono-mp3' `
)
# WAV File format
$AudioOutputType=$AudioFormats[4]
$UserAgent='PowerShellForAzureCognitiveApp'
$Header=@{ `
'Content-Type' = 'application/ssml+xml'; `
'X-Microsoft-OutputFormat' = $AudioOutputType; `
'X-Search-AppId' = $XSearchAppId; `
'X-Search-ClientId' = $XSearchClientId; `
'Authorization' = $AccessToken `
}
$Body=''+$Content+''
Invoke-RestMethod -Uri "https://speech.platform.bing.com/synthesize" -Method 'POST' -Headers $Header -ContentType 'application/ssml+xml' -Body $Body -UserAgent $UserAgent -OutFile $Filename
}
I can now use this function and dynamically supply the region data, as well as the content, in a loop or script!
Challenge #2 – Get a nice way to play WAV files synchronously, without launching additional applications.
I used a simple function based upon the earlier posted PowerTip to solve this issue.
Function Play-MediaFile($Filename)
{
$PlayMedia=New-object System.Media.Soundplayer
$PlayMedia.SoundLocation=($Filename)
$PlayMedia.playsync()
}
Challenge #3 – Get rid of the text file. I want to read the content straight from The Abbott and Costello Fan Club.
Connecting was easy. Just use Invoke-WebRequest, and store the content in an object.
$RawSketch=Invoke-WebRequest -Uri 'http://www.abbottandcostellofanclub.com/who.html'
The challenge was that the returned content was one massive string. I needed it broken up into lines for an array.
I’m sure I could have contacted some friends like Tome Tanasovski or Thomas Rayner for some help with regular expressions, but I like trying alternative approaches sometimes.
There were a lot of CRLF (CarriageReturn / LineFeed) and Tabs prefacing the lines. I needed that cleaned up.
$CR=[char][byte]13
$LF=[char][byte]10
$Tab=[char][byte]9
$RawSketchContent=$RawSketch.Content
$RawSketchContent=$RawSketchContent.Replace($cr+$lf+$tab,' ')
Once I completed this, I just had a nice list of content terminating in carriage returns. I could split this up into an array now, in the following fashion:
$SketchArray=$rawsketchcontent.split("`r")
I took a look at the raw HTML, and found a “Before” and “After” on the sketch content. I passed this into Select-Object and captured the line numbers of the array. This allowed me to have a “Begin” parsing point, and an “End.”
$StartofSketch=$SketchArray | Select-string -SimpleMatch '<PRE>' | Select-Object -expandproperty LineNumber
$EndofSketch=$SketchArray | Select-string -SimpleMatch '</PRE>' | Select-Object -expandproperty LineNumber
With this achieved, I needed to select two voices in Cognitive Services Text-to-Speech. If you remember Part 4 in the series, we showed the list to choose from. I decided on an Australian female voice for Bud Abbott, and an Irish male voice for Lou Costello.
I used a simple array to store the data.
$CognitiveSpeakers=@()
$CognitiveSpeakers+='BUD:;en-AU;"Microsoft Server Speech Text to Speech Voice (en-AU, Catherine)"'
$CognitiveSpeakers+='LOU:;en-IE;"Microsoft Server Speech Text to Speech Voice (en-IE, Shaun)"'
We need to initial certain variables to figure out Who is talking (well yes, of course he is, that’s his job), and to store away the audio content.
$CurrentSpeaker='Nobody'
$TempVoiceFilename='whoisonfirst.wav'
Now for the work to begin. We start our loop from the beginning of the content array to the end, and make sure any temporary WAV file is erased from a previous run.
For ($a=$StartofSketch+1; $a -lt $EndofSketch; $a++)
{
Remove-Item $TempVoiceFilename -Force -ErrorAction SilentlyContinue
We then identify a line of content to parse:
$LinetoSpeak=$sketcharray[$a-1]
Each line that has a speaker on the site began with either BUD: or LOU:, so I used a little RegEx to trap for where the identified speaker name ended. Anything after that would be their speaking content.
$SearchForSpeaker=(($LinetoSpeak | Select-String -Pattern '[a-zA-Z]+(:)').Matches)
The next scenario to trap for was whether the line contained a speaker name with text, or just text (which meant a continuation of the earlier line).
This variable would set to 1 (beginning of a line). If a speaker was found, the beginning of the content would naturally be further down the line.
$LinetoSpeakStart=1
Then I had to trap for some “fun situations.” Did the speaker change? Is it the same speaker, but they have more lines to speak?
If ($SearchForSpeaker -ne $NULL)
{
$Speaker=$SearchForSpeaker[0].Value
$LinetoSpeakStart=$SearchForSpeaker[0].Index + $SearchForSpeaker[0].Length + 5
Then of course if the speaker did change, I needed to repopulate objects unique to the speaker for Azure.
If ($Speaker -ne $CurrentSpeaker)
{
$CurrentSpeaker = $Speaker
$RawSpeakerData=$CognitiveSpeakers -match $CurrentSpeaker
$SpeakerData=$RawSpeakerData.split(';')
$Region=$SpeakerData[1]
$Voice=$SpeakerData[2]
$Name=$SpeakerData[0]
}
As you can see, I’m pulling in the data needed for Azure, like Voice and Region from the SpeakerData array I created earlier.
Once we’ve identified the speaker and the content, we can call up the two key functions of Invoke-AzureTextToSpeech and Play-MediaFile:
If ($LinetoSpeak.Length -gt 1)
{
$LinetoSpeak.replace('','').replace('','')
$Content=$LineToSpeak.Substring($LinetoSpeakStart).replace('','').replace('','')
Invoke-AzureTextToSpeech -Region $Region -Content $Content -Voice $Voice -Filename $TempVoiceFilename
Do { } until (Test-Path $TempVoiceFilename)
Play-MediaFile -filename $TempVoiceFilename
Start-Sleep -Milliseconds 1000
}
You’ll note that there is a Start-Sleep in the loop. This is because there is a limit on the REST API of how many transactions it can take within a certain timeframe.
I thank you for sharing your time with me today. Hopefully you had a little fun, and maybe even learned of some ways you, too, can play with HTML content.
If you see a more efficient way of doing this, I’d love to see the results! It could be a really cool blog post itself!
Until next time, remember that the Power of Shell is in you!
I invite you to follow the Scripting Guys on Twitter and Facebook. If you have any questions, send email to them at scripter@microsoft.com, or post your questions on the Official Scripting Guys Forum.
Sean Kearney, Premier Field Engineer, Microsoft
Frequent contributor to Hey, Scripting Guy!
Summary: A simple way to power off your computer by using the Windows PowerShell cmdlets.
Hey, Scripting Guy! I’ve got a script that needs to power off a system after it’s done. How can I accomplish this with PowerShell?
Look no further than the Stop-Computer cmdlet to turn off the power! (How’s THAT for a power tip?) Here are some examples:
# Try without doing anything bad
Stop-Computer -WhatIf
# Stop the local computer
Stop-Computer
# Try without doing anything bad on multiple systems
Stop-computer -ComputerName 'computer01','computer02','computer03' -whatif
# Stop multiple systems
Stop-computer -ComputerName 'computer01','computer02','computer03'
Summary: Creating sample files with random sizes and dates for use in a Lab
Q: Hey, Dr. Scripto!
From time to time I like to show “how things works” at User Group meetings and to colleagues. But I don’t always have a good pile of sample files. Do you have any examples of how to create some “Demo data”?
—SH
A: Hello SH,
I actually ran into the same problem a few weeks ago when I was writing an article. I needed exactly that!
What I needed was a folder full of sample files with not only random file names, but random content and even random dates.
Just *how* could I achieve that?
The first thought I had was “Just generate random filenames of numbers and put in a generic bit of content.”
This simple solution would be a start
# Provide Folder name and create
$Folder='C:\Demo'
New-Item -ItemType Directory -Path $Folder
# Create a series of 10 files
for ($x=0;$x -lt 10; $x++)
{
# Let's create a completely random filename
$filename="$($Folder)\$((Get-Random 100000).tostring()).txt"
# Now we'll create the file with some content
Add-Content -Value 'Just a simple demo file' -Path $filename
}
There! A repeatable solution to create 10 simple files!
Oh but wait, they were two problems I saw. Both were irritating.
These things I could improve. I decided with preclude the number with a name like ‘LogFile’ so at least they *could* look a bit more legitimate.
For content…. How could I solve that?
I decided on a second loop of random limits and to populate it with ASCII values.
The useful values in ASCII (vs. PetSCII or ATASCII if you’re REALLY a Nerd from the ‘80’s) numbered from 32 to 96. Those values would give me everything from a blank space to a little “Backtick”
Get-Random would work but it would start from 0 to a number. I needed to ensure I picked a numeric range between 32 and 96.
This was solved using this statement
(Get-Random 64)+32
Now the only challenge was to convert the Number to a Character. You can convert an ASCII character to it’s numeric equivalent using the following statement. (Here we convert the letter ‘A’ to it’s ASCII equivalent).

We can REVERSE the process by swapping them around and providing the numeric equivalent.

To get my Random Number as character (Provide I have a range of values between 0 and 255 as a result) I would use this statement.
[char][byte]((Get-Random 64)+32)
So create a random string of content I just created a simple loop such as this.
# We're going to build files up to 1K in size
$limit=(Get-random 1024)
# Let's build the random content
for($y=0;$y -lt $limit;$y++)
{
# We're building a content of pure ASCII data
$a=$a+[char][byte]((Get-Random 64)+32)
}
Ok… it didn’t produce deep reading material, but I could produce random content up to 1 kilobyte in size to replace for the little string that read ‘Just a simple demo file’
To alter the filename to have “Logfile” at the beginning I simply injected the name into the string like this.
$filename="$($Folder)\Logfile$((Get-Random 100000).tostring()).txt"
If you’re new to PowerShell I could also have put the pieces of the string together individually like this.
$filename=$Folder+'\Logfile'+((Get-Random 100000).tostring())+'.txt'
Let’s review
I was sitting there pleased with myself. I could easily alter the value and have Thousands of files.
“Muah ha ha ha haaaa!” I cackled like Doctor Frankenstein who is about to give life to the monster!
….and then (don’t you those?)
I realized every single file was just a sequence of the same date and time. I wanted to be able to have content that had random dates and times.
For this I had to go up a level in permissions with using Administrative rights (Remember this is for DEMO content)
I knew with PowerShell I can access and CHANGE the current date and time with the following two Cmdlets.
Get-Date
Set-Date
I also knew I could adjust the Date and Time in precise increments in the following fashion
$TimeDifference=New-TimeSpan -Minutes 30
Set-Date -Adjust $TimeDifference
Now the wheels were churning. I needed a loop to do the following
Now I’m certain many of you have access to a T.A.R.D.I.S. but good old Dr. Scripto doesn’t, so here at the Scripting Blog we use PowerShell.
Here’s an example of that very code that adjusts the time, creates the file and then Sets time back. Or mostly back at least.
$DaysToMove=((Get-Random 120) -60)
$HoursToMove=((Get-Random 48) -24)
$MinutesToMove=((Get-Random 120) -60)
$TimeSpan=New-TimeSpan -Days $DaysToMove -Hours $HoursToMove -Minutes $MinutesToMove
# Now we adjust the Date and Time by the new TimeSpan
# Needs Admin rights to do this as well!
Set-Date -Adjust $Timespan | Out-Null
# Create that file
Add-Content -Value $a -Path $filename
# Now we REVERSE the Timespan by the exact same amount
$TimeSpan=New-TimeSpan -Days (-$DaysToMove) -Hours (-$HoursToMove) -Minutes (-$MinutesToMove)
Set-Date -Adjust ($Timespan) | Out-Null
Now pleased with the results…. The Script was re-run

There are other things I could do to this script, such as have it test for existence of the Demo folder or ensure filenames were never duplicated. But this was to create some basic “dummy Data”.
If you have to create a demo environment, you can use similar techniques to these for populating Active Directory users or SQL tables as well.
I hope this was a fun and informative read for you today and that you’re enjoying the weather as well!
I invite you to follow the Scripting Guys on Twitter and Facebook. If you have any questions, send email to them at scripter@microsoft.com, or post your questions on the Official Scripting Guys Forum. See you tomorrow.
Until we meet again, just remember we can all change the one world with just one Cmdlet at a time!
Cheers!
Sean Kearney, Premier Field Engineer, Hey Scripting Guy
Windows PowerShell, Sean Kearney, Hey Scripting Guy
Summary: Using the Get-Random Cmdlet to select a random list of names instead of numbers
Hey! Dr. Scripto!
I’d like to pick a random name from a list to generate user names in my lab. Could you show me an example?
I’d be delighted to. Just use an array of names and then add them as a parameter to Get-Random. You could even pipe it to Get-Random if you liked as well.
$NameList='John','Charlotte','Sean','Colleen','Namoli','Maura','Neula'
Get-Random -InputObject $NameList
Windows PowerShell, Sean Kearney, Scripting Guy, PowerTip
Summary: Using PowerShell to automate Quser to identify users to Logoff systems in Windows
Hey Doctor Scripto! I need to log a user off every computer they’re logged into. The problem is, I don’t know which ones. How can I discover which computers they’re logged into and then log them off?
That’s a most excellent question! I know just the person who can answer that. I was talking my good friend Dan Reist on this topic. Dan is a Senior Consultant on Data Platforms here at Microsoft. He actually ran into that same issue.
Dan, the room is yours today, take it away!
Thanks Doctor Scripto!
So my first thought to that is “Very carefully!” Let’s simplify the question by looking at one specific computer.
First, let’s define the username and computer name we’re investigating.
$userName = ‘randomnote1’
$computer = ‘sqlserver01’
Now, let’s use the quser (query user) command to get all the user sessions on the computer.
$quserResult = quser /server:$computer 2>&1
When we examine the contents of the $quserResult variable it contains a nicely formatted table
USERNAME SESSIONNAME ID STATE IDLE TIME LOGON TIME
randomnote1 console 1 Active none 8/14/2019 6:52 AM
Cool, we can clearly see that the user randomnote1 is logged onto this computer. The problem is, this is just a string array. Not very easy to work with! However, it looks like the table is formatted with at least two spaces between each column. That should be easy to replace with some commas to make a CSV!
$quserRegex = $quserResult | ForEach-Object -Process { $_ -replace '\s{2,}',',' }Now when we look at the contents of $quserRegex, we can see an array of comma separated values.
USERNAME,SESSIONNAME,ID,STATE,IDLE TIME,LOGON TIME
randomnote1,console,1,Active,none,8/14/2019 6:52 AM
Now we’re getting somewhere. Let’s use ConvertFrom-Csv to convert the CSV into a PowerShell object.
$quserObject = $quserRegex | ConvertFrom-Csv
Look at the contents of $quserObject, we can see it now looks like a PowerShell object!
USERNAME SESSIONNAME ID STATE IDLE TIME LOGON TIME
————————————————————————–
randomnote1 console 1 Active none 8/14/2019 6:52 AM
Finally, we can extract the session id for the user we need to log off and log the user off the computer!
$userSession = $quserObject | Where-Object -FilterScript { $_.USERNAME -eq 'randomnote1' }
logoff $userSession.ID /server:$computer
That’s all there is to it! Now you can operationalize it by performing these steps over an array of computers.
$computers = Get-ADComputer -Filter * | Select-Object -ExpandProperty Name
foreach ( $computer in $computers )
{
	$quserResult = quser /server:$computer 2>&1
	If ( $quserResult.Count -gt 0 )
{
		$quserRegex = $quserResult | ForEach-Object -Process { $_ -replace '\s{2,}',',' }
		$quserObject = $quserRegex | ConvertFrom-Csv
		$userSession = $quserObject | Where-Object -FilterScript { $_.USERNAME -eq 'randomnote1' }
		If ( $userSession )
		{
			logoff $userSession.ID /server:$computer
		}
	}
}
Thank you Dan! That’s not only a cool trick but a beautiful example of using both legacy Console commands and PowerShell together to produce a new solution!
I invite you to follow me on Twitter and Facebook. If you have any questions, send email to me at scripter@microsoft.com, or post your questions on the Official Scripting Forum. See you tomorrow. Until then, peace.
Your good friend, Doctor Scripto
Doctor Scripto, Dan Reist, PowerShell
The post Automating Quser through PowerShell appeared first on Scripting Blog.
Summary: Using PowerShell and a very simple Regular Expression to convert Random counts of spaces to a Comma

Hey Doctor Scripto! I have some string based output from a non PowerShell application. The output is good but I need to easily parse it. Is there a way to convert that data to something consistent like “Comma Separated?”

Why yes you can! This is something that is easily done with a regular expression. Using a simple example like this will identify all content with more than one blank space separating it, and replace it with a comma!
$SampleText=’Hello This is your Good Friend Doctor Scripto’
$SampleText -replace ‘\s{2,}’ , ‘,’

I invite you to follow me on Twitter and Facebook. If you have any questions, send email to me at scripter@microsoft.com, or post your questions on the Official Scripting Forum. See you tomorrow. Until then, peace.
Your good friend, Doctor Scripto
PowerShell, Doctor Scripto, PowerTip, Dan Reist, Regular Expressions
The post PowerTip: Using PowerShell to Convert raw Text to a Comma Separated columm appeared first on Scripting Blog.
Summary: Using the ConvertFrom-JSON and ConvertTo-JSON Cmdlets to edit a configuration file
Q: Hey, Doctor Scripto!
I need to be able to change the Startup settings in Teams (like the Auto launch feature). I can change it in the Interface, but I need to be able to edit across multiple systems. Could you lend me a hand?
—RL
A: Hello RL,
A very excellent question. For which it produced a most interesting solution when I asked Sean Kearney one of our Microsoft PFE’s to look at it. Take it away Sean!
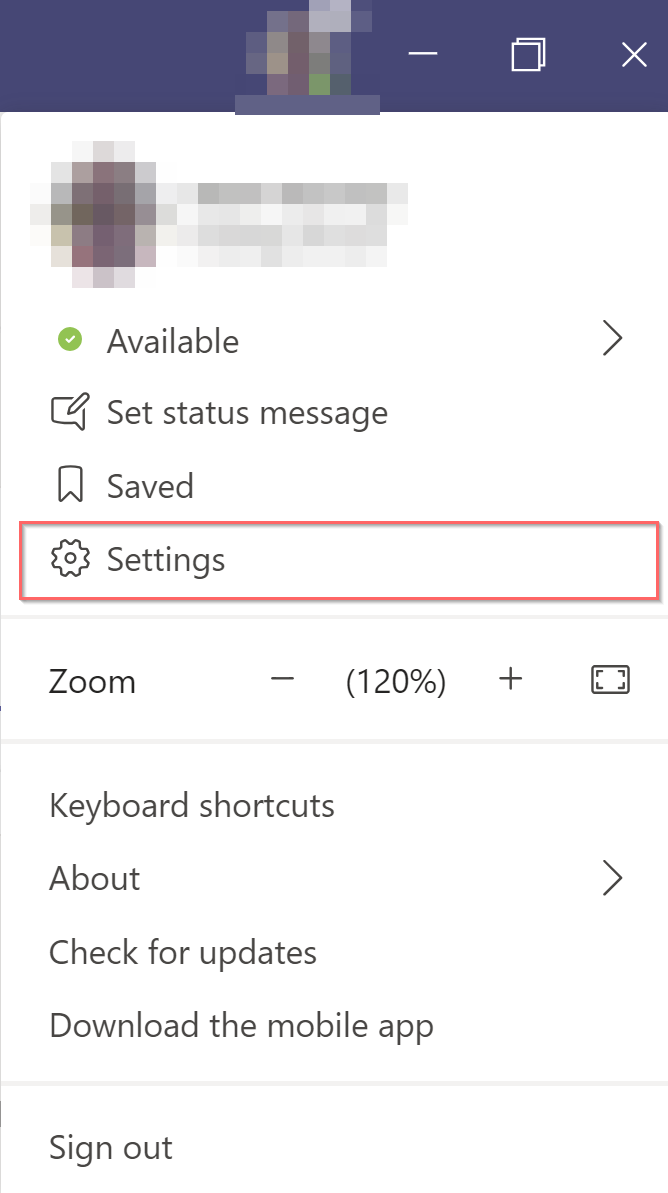
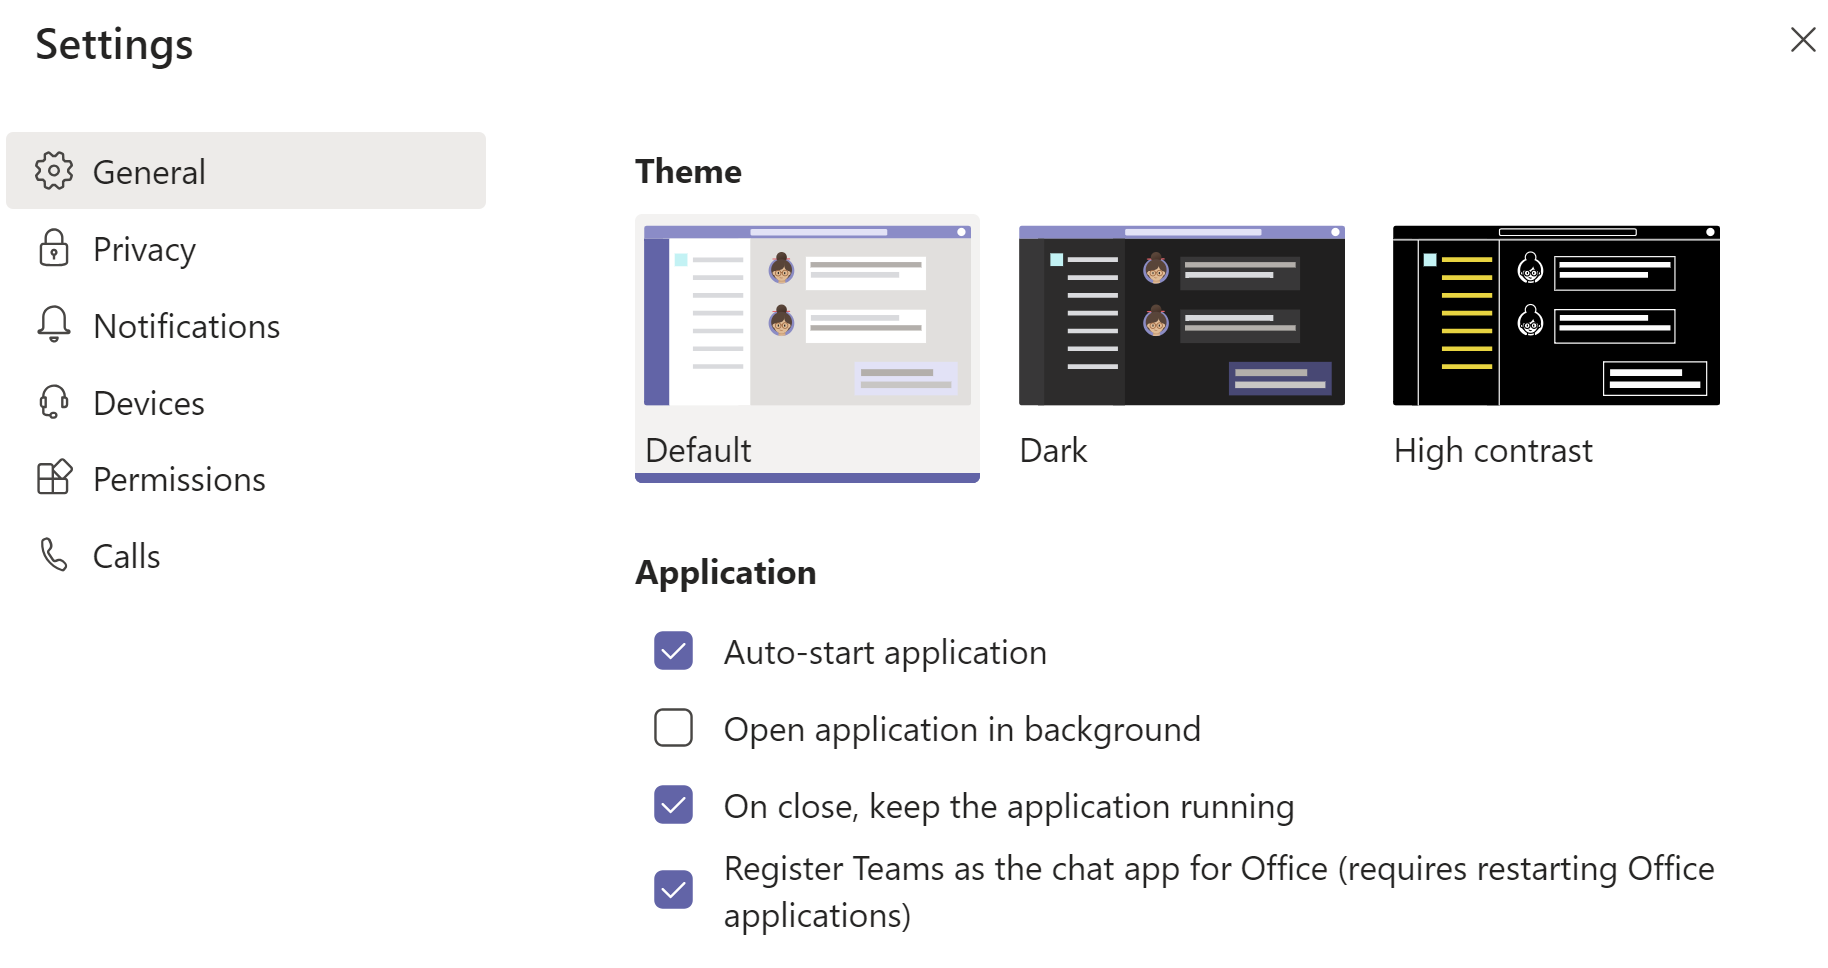
Let’s begin by examining the settings we are trying to change. They can be accessed under the “Settings” in Teams
I saw the settings in questions but there didn’t appear to be a Group Policy which managed them. There was a Policy that could be found here to prevent the initial startup that could be found here. In addition, if so desired you could edit the XML file for Office Click to run to exclude the installation of Teams if so desired.
But if Teams was deployed and initially an Office wanted to delay use (*after say, until staff were trained*) it would still launch at login in some cases.
Since I couldn’t find a way online to do it so I decided to investigate. The first question which needed to be answered was “Where are the settings stored?”
To find that answer I pulled out the ever trustworthy tool from Sysinternals called “Procmon” which allows you to see what files and registry entries a process is accessing.
If you are curious on how to use this tool there is an excellent link from Christopher Haun on MSDN as well as a cool video from Scott Hanselman. In addition there are books written by Mark Russinovich and Aaron Margosis to show you all the ins and outs of this great suite of tools.
With a little bit of work I found a file which seemed to be written to when I checked and cleared the respective boxes. It was located under the following folder
$ENV:APPDATA\Microsoft\Teams\desktop-config.json
Since it was a JSON formatted file, I was able to read it and Convert it to a standard PowerShell object using this piece of PowerShell
# Read File into memory and store in $FileContent Object
$FileContent=Get-Content -path "$ENV:APPDATA\Microsoft\Teams\desktop-config.json"
# Convert Content from JSON format into a PowerShell Object
$JSONObject=ConvertFrom-Json -InputObject $FileContent
Once I had this object I could examine the contents (and did of course!)

I could see several settings, but one appeared to contain the four I was looking for, “appPreferenceSettings”

I examined one of the values that I was interested in. I needed to know type of an object it contained, in this case the ‘openAtLogin’ one. For this we can leverage the gettype() method which will show us the Type of object it is.

Knowing this was a Boolean Object, if I wanted to clear the box I needed to set it from $True (checked off) to $False (Cleared)
I updated the value in the following fashion.
$JSONObject.appPreferenceSettings.openAtLogin=$false
Now to test this I needed to do three things.
# Stop Teams Process
Get-Process Teams | Stop-Process -force
$NewFileContent=$JSONObject | Convertto-JSON
# Update Teams Configuration file
$NewFileContent | Set-Content -path “$ENV:APPDATA\Microsoft\Teams\desktop-config.json”
I launched the Teams process and examined the settings which confirmed it was updated properly! I actually did a little dance on that one when I saw it work. (No really I did, and Mrs. EnergizedTech looked at me funny when it happened  )
)
The process then was clearly simple.
Here it was written as a Parameterized Script
param(
# Teams open in the background Hidden $true or $false
[boolean]$OpenAsHidden=$False,
# Teams open automatically at user login $true or $false
[boolean]$OpenAtLogin=$False,
# Close Teams App fully instead of running on Taskbar $true or $false
[boolean]$RunningOnClose=$False
)
# Get Teams Configuration
$FileContent=Get-Content -Path "$ENV:APPDATA\Microsoft\Teams\desktop-config.json"
# Convert file content from JSON format to PowerShell object
$JSONObject=ConvertFrom-Json -InputObject $FileContent
# Update Object settings
$JSONObject.appPreferenceSettings.OpenAsHidden=$OpenAsHidden
$JSONObject.appPreferenceSettings.OpenAtLogin=$OpenAtLogin
$JSONObject.appPreferenceSettings.$RunningOnClose=$RunningOnClose
# Terminate Teams Process
Get-Process Teams | Stop-Process -Force
# Convert Object back to JSON format
$NewFileContent=$JSONObject | ConvertTo-Json
# Update configuration in file
$NewFileContent | Set-Content -Path "$ENV:APPDATA\Microsoft\Teams\desktop-config.json"
Now with this script it was possible to update the settings in an easier fashion whether by Group Policy, Login script or any one of many other options.
I hope you found this of use in one of three ways
Thanks Sean for sharing that with us! So RL that is all there is to editing the Teams configuration with PowerShell.
I invite you to follow me on Twitter and Facebook. If you have any questions, send email to me at scripter@microsoft.com, or post your questions on the Official Scripting Forum. See you tomorrow. Until then, peace.
Your good friend, Doctor Scripto
PowerShell, Doctor Scripto, Sean Kearney, JSON, Teams, Sysinternals, Procmon
The post Configuring Startup Settings in Microsoft Teams with Windows PowerShell appeared first on Scripting Blog.
Summary: Using the ConvertFrom-Json Cmdlet in PowerShell to read a JSON formatted file

Hey, Doctor Scripto! I’ve seen a lot of JSON files in use in Azure. I’m not very good with editing JSON properly. Is there an easy way to read this and at least edit it with PowerShell?

Most definitely my good friend. For the file below called “settings.json” you can convert it to a PowerShell Object for editing purposes using the following line. Once you have completed this, you can manipulate it like any other PowerShell Object.
$PowerShellObject=Get-Content -Path settings.json | ConvertFrom-Json

PowerShell, Doctor Scripto, Sean Kearney, PowerTip, JSON
The post PowerTip: Read a JSON configuration file as a PowerShell object appeared first on Scripting Blog.
Summary: Discovering some of the awesome and neat ways to leverage a Here-String in a Script or function
Q: Hey, Doctor Scripto!
I used to write scripts with supporting configuration files that never really changed. I was wondering if there was any way to put them INSIDE the script directly to make it self contained.
—AB
A: Hello AB, I was chatting with my good friend Sean on this one. Here he talks about using Here-Strings to solve this problem.
Thanks Doctor Scripto, yes a Here-String can be a great way to embed the configuration or other data for that matter in a script.
If you’ve never encountered a Here-String before, this is an example.
$Message=@'
Hello people, this is Doctor Scripto
Welcome to the Scripting Blog
Today we're showing you a Here-String.
'@
When you examine the properties of $Message you’ll see it not an Array but one long string (including carriage returns and linefeed characters within)
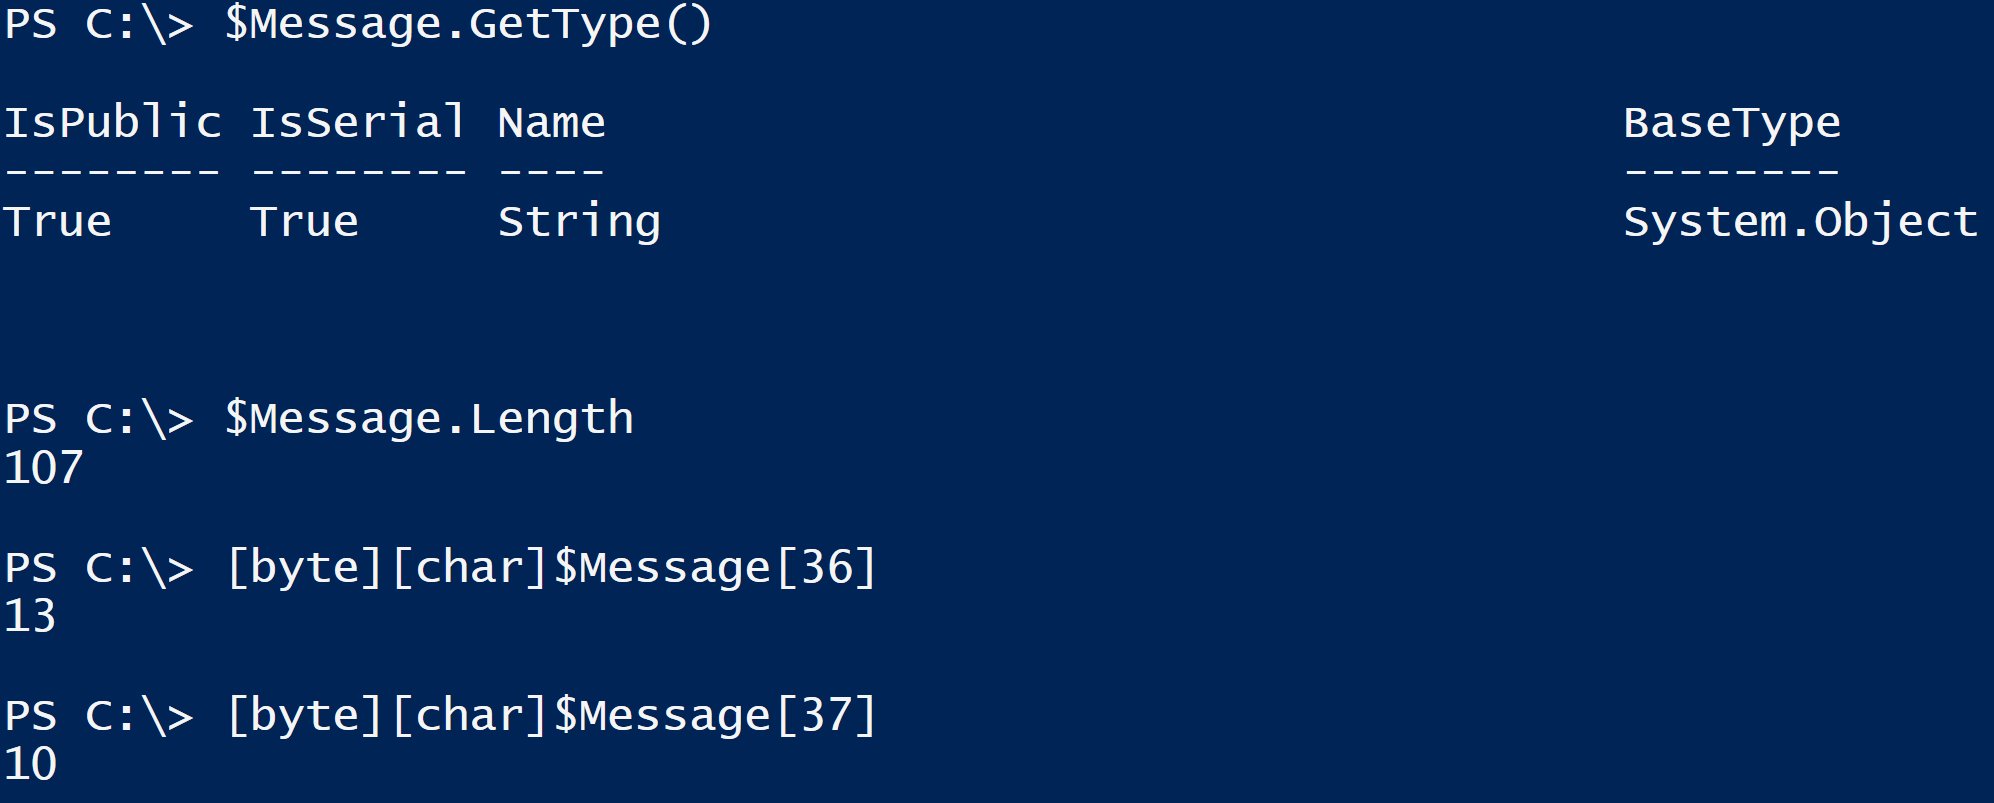
Now if the Here-String is enclosed within Single Quotes (just like any other string in PowerShell) it is taken as a literal (Nothing is interpreted). Why you could almost say a Here-String written in this fashion is truly “What You See Is What You Get”.
What is nice about this is if you wanted something in the script to be editable by a NON scripter, such as a welcome message, Placing it in a Literal Here-String makes it much easier for a non tech to do it.
Another example of a Here-String is when you enclose it with Double Quotes (“). When it’s done this way the content is now Evaluated in the parser before it is consumed by the rest the script. Here’s a simple example such as new user Letter
$FirstName='Doctor'
$LastName='Scripto'
$UserID=$Firstname+'.'+$Lastname
$PhoneNumber='425-555-1212'
$Office='Seattle'

$TemporaryPassword=[System.Web.Security.Membership]::GeneratePassword(10,0)

$WelcomeLetter=@"
Hello and welcome to Contoso $FirstName !

Your user id on the system will be $UserID with a Temporary Password of $TemporaryPassword
and your home Office is in $Office. You can be reached at $PhoneNumber.

If you have any issues with your setup you can call 425-555-1111 in order to reach the Help desk.

Thanks!
Your Friendly Neighborhood It Department
"@
If you ran this and went to display the object $WelcomeLetter , instead of seeing Variables it would all expand to real values like this.

Again something that’s a bit easier to edit and view. But how about an array of information? Normally I would read an array in this fashion.
[system.array]$Somelist='Value1','Value2','Value3','Value4'
But for a person who might NOT be a PowerShell Guru, wouldn’t it be cool to place that array in this fashion?
$SomeListToUse=@'
Value1
Value2
Value3
Value4
'@
We can take this string and convert it to an array with a simple use of -replace in PowerShell (to clear out the LineFeeds in the Here-String (ASCII 10).
$SomeList=$SomeListToUse -replace "`n" , ''
Then we can use split method by targeting the “CarriageReturn” (ASCII 13) at the termination of the string to convert it to an Array.
$SomeList=$SomeList.split("`r")Now an interesting thing to note when converting a Here-String to an array in PowerShell core is the Linefeed character is not used in this environment (think of standard Text file in a Unix environment, you probably won’t see a linefeed anywhere in it)
In which case our conversion would look like this
$SomeList=$SomeListToUse.split("`r")We could even put in a CSV list in a script in this fashion (Just as if it were an external CSV file) and keep it completely self-contained.
$CSVListTemp=@'
UserID,Domain
DScripto,Contoso
JSmith,Fabrikam
'@

$CSVList=$CSVListTemp -replace "`n" , ''
$CSVList=$CSVList.split("`r")
$CSVData=$CSVList | ConvertFrom-CSV
Of course these are just examples of ways you COULD use a Here-String within a script, not how you MUST.
But I thought it would be interesting to share some thoughts for those of you unfamiliar with Here-Strings. They do provide some interesting options in PowerShell
AB that is all there is to using Here-String for the moment. But who knows? They may be more to discover next Week!
I invite you to follow me on Twitter and Facebook. If you have any questions, send email to me at scripter@microsoft.com, or post your questions on the Official Scripting Forum. See you tomorrow. Until then, peace.
Your good friend, Doctor Scripto
PowerShell, Doctor Scripto, Sean Kearney
The post Maximizing the Power of Here-String in PowerShell for Configuration Data appeared first on Scripting Blog.
Summary: Pulling up the properties of $PSVersionTable to identify your PowerShell edition

Hey, Doctor Scripto! I want to write my modules and scripts to be more portable. How can I tell if I am executing on PowerShell Core?

Just use the $PSVersionTable object and examine the PSEdition value. If it returns ‘Core’ you are running on PowerShell core.
$PSVersionTable.PSEdition

PowerShell, Doctor Scripto, PowerTip, Sean Kearney
The post PowerTip: Identify if you are running on PowerShell Core appeared first on Scripting Blog.
Summary: Creating a Function in PowerShell and the power of the $PSVersionTable to make code more portable
Q: Hey, Doctor Scripto!
I saw that post last week on converting Here-String into an array. I wanted to write my code to trap for PowerShell and PowerShell Core. Could you give me a helping hand?
—PG
A: Hello PG,
Hello everyone, your good friend Doctor Scripto is here with Sean sitting across from me having lunch. Sean what do you think about this idea?
Well Doctor Scripto this is actually pretty easy and it makes a LOT of sense to have a function do this to avoid re-writing the same code.
Last week we saw this as a possible solution to convert this Here-String to an array.
$SomeListToUse=@'
Value1
Value2
Value3
Value4
'@

$SomeList=$SomeListToUse -replace "`n" , ''
$SomeList=$SomeList.split("`r")
This works very well. However the challenge as we discovered was if you run this on an environment using PowerShell Core (because of the lack of Linefeeds used) it needed to be re-written this way.
$SomeList=$SomeListToUse.split("`r")As you can see, the second time we weren’t removing the Linefeed
Now our challenge is this. How to trap for this in code? Our PowerTip last week pointed out that using $PSVersionTable we can identify if we’re running on PowerShell core by watching the PSEdition property.
In our Script we could simply do this as a simple way to make this work in both PowerShell Core and Windows PowerShell.
If ($PSVersionTable.PSedition -eq 'Core')
{
     $SomeList=$SomeListToUse.split("`r")
}
Else
{
     $SomeList=$SomeListToUse -replace "`n" , ''
     $SomeList=$SomeList.split("`r")
}
But what if we need to repeat this process *and* be portable? For this we can use a function to convert our Here-String to an array AND be portable between PowerShell Core and Windows PowerShell.
function ConvertFrom-HereString {
param (
[string]$String=''
)

If ($PSVersionTable.PSEdition -eq 'Core')
     {
          [system.array]$NewArray=$String.split("`r")
     }
else
     {
          $CleanString=$String -replace "`n" , ''
          [system.array]$NewArray=$CleanString.split("`r")
     }

     return $NewArray

}
We can now, independent of the PowerShell platform type, leverage this function in the same fashion. We can convert Here-String data to an array with this new function.
$HereStringSample=@'
Value1
Value2
Value3
Value4
'@

[system.array]$MyNewArray=ConvertFrom-HereString -string $HereStringSample
Just for fun, I tested this on my Windows 10 environment in Windows PowerShell, the Windows Subsystem for Linux (Ubuntu) with PowerShell Core AND PowerShell Core in Windows 10.
PG that is all there is to the basics of writing a Platform independent function in PowerShell.
I invite you to follow me on Twitter and Facebook. If you have any questions, send email to me at scripter@microsoft.com, or post your questions on the Official Scripting Forum. See you tomorrow. Until then, peace.
Your good friend, Doctor Scripto
PowerShell, Doctor Scripto, Sean Kearney, Scripting Techniques
The post Creating a Platform Independent Function in PowerShell appeared first on Scripting Blog.
Summary: Using $PSVersionTable to identify if you are on Windows or Unix

Hey, Doctor Scripto! I’m working on my PowerShell scripts and I need to be able to identify if I’m working on Windows or Linux. How can I do this easily?

No problem at all and glad to help. Just examine the $PSVersionTable property called Platform. It will contain one either ‘Unix’,’Win32NT’ on PowerShell Core. In the case of Windows PowerShell it will not exist.
$PSVersionTable.Platform

PowerShell, Doctor Scripto, PowerTip, Sean Kearney
The post PowerTip: Identify which Platform PowerShell is running on appeared first on Scripting Blog.